Install and Configure Affirm on SAP Commerce
This guide walks you through configuring Affirm at checkout in SAP Commerce.
Overview
This guide describes how to integrate Affirm into your SAP Commerce platform so that you can provide Affirm as a payment option to your customers. After integrating Affirm, your SAP Commerce site will:
- Offer Affirm as payment option on the checkout page.
- Process Affirm charges in your order management system.
- Display Affirm promotional messaging.
Prerequisites
Before beginning the integration, you should review the following:
- The transaction flow when buying with Affirm.
- Your current checkout process to understand how Affirm will affect operations and customer experience.
- Settlement reports to know how to reconcile transactions with the deposits into your bank account.
- The timeline for receiving Affirm deposits into your bank account.
Sandbox developmentYou should have received an email inviting you to create an Affirm account. Click here for information about accessing your account.
Develop and test the Affirm integration in your development environment connected to our sandbox. To use our sandbox, retrieve your sandbox API keys at https://sandbox.affirm.com/dashboard/#/apikeys for use during integration.
After development and testing, you'll need to update your integration to use your live API keys, which you can find at https://affirm.com/dashboard/#/apikeys.
Integration Steps
Installing Affirm on SAP Commerce requires downloading the add-on, updating localextensions.xml, running the installation command and rebuilding/updating the system.
Download Add-on
- Download source from the repo:
- The source will need to be downloaded locally from the repo (click here) and then placed into a directory as outlined in the next step.
- Place folders in custom folder into custom folder of SAP Commerce Suite (
<HYBRIS_HOME>/bin/custom)
Update localextensions.xml
- Check the presence of
<extension name="addonsupport" />in the localextensions.xmlfile - Add extension
<extension name=" affirmpaymentaddon " /> - Add extension
<extension name="affirmpaymentcore" /> - Add extension
<extension name="'affirmpaymentfulfilmentprocess'" /> - Check the presence of the target storefront extension
Run Installation Command
- If SAP Commerce is running, stop it. Depending on the server start mode we can use one of following method to stop SAP Commerce server.
- If the SAP Commerce server was started with embedded mode, press Ctrl+C to stop SAP Commerce server.
- If the SAP Commerce server was started with service mode run the following command to stop:
- Windows:
hybrisserver.bat stop\ - Unix:
./hybrisserver.sh stop\
- Windows:
- Go to
<HYBRIS_HOME>/bin/platformand run the following command if it was not applied in this terminal:- Windows:
setantenv.bat\ - Unix:
. ./setantenv.sh
- Windows:
- Go to
<HYBRIS_HOME>/bin/platformand run the installation add-on with the command:
ant addoninstall -Daddonnames="affirmpaymentaddon" -DaddonStorefront.yacceleratorstorefront="yacceleratorstorefront"Rebuild the System
- Go to
<HYBRIS_HOME>/bin/platformand rebuild the system with the command: ant clean all.
ant clean all- Add
/checkout/affirm/authoriseto yourcsrf.allowed.url.patternsproperty.
csrf.allowed.url.patterns=/[^/]+(/[^?]*)+(sop/response)$,/[^/]+(/[^?]*)+(merchant_callback)$,/[^/]+(/[^?]*)+(hop/response)$,/[^/]+(/[^?]*)+(language)$,/[^/]+(/[^?]*)+(currency)$,/checkout/affirm/authoriseUpdate the System
After the previous step you may need to perform full initialization through SAP Commerce Administration Console (hAC) if this is the first installation of SAP Commerce.
If you have already performed full initialization then you need to update your SAP Commerce system as follows:
- Open web browser, go to hAC → Platform → Update.
- Deselect the checkbox stating
Create essential data".
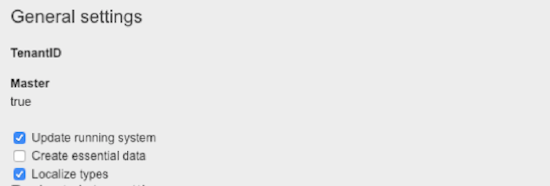
- Select the checkboxes next to
affirmpaymentcore,affirmpaymentfulfilmentprocessandaffirmpaymentaddon

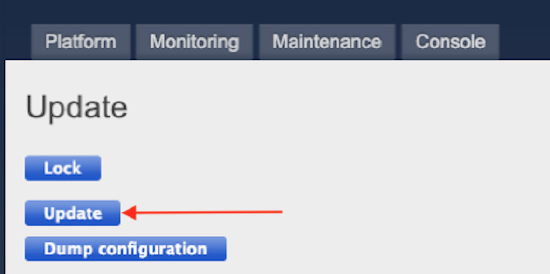
- Click on the Update button to update the SAP Commerce system.
2. Activate and Configure Affirm as a Payment Option
After installing affirmpaymentaddon successfully, you can now login to SAP Commerce backoffice to set up the Affirm configuration and assign it to specific sites in SAP Commerce.
- Login with Admin credentials to backoffice.
- View Affirm Payments configuration
Updating Affirm Settings
NoteChanges to the Affirm settings for BaseSite are made within AffirmConfigContainer, which is the container Affirm-related configurations. AffirmConfigContainer is added as an attribute to BaseSite to support Affirm.
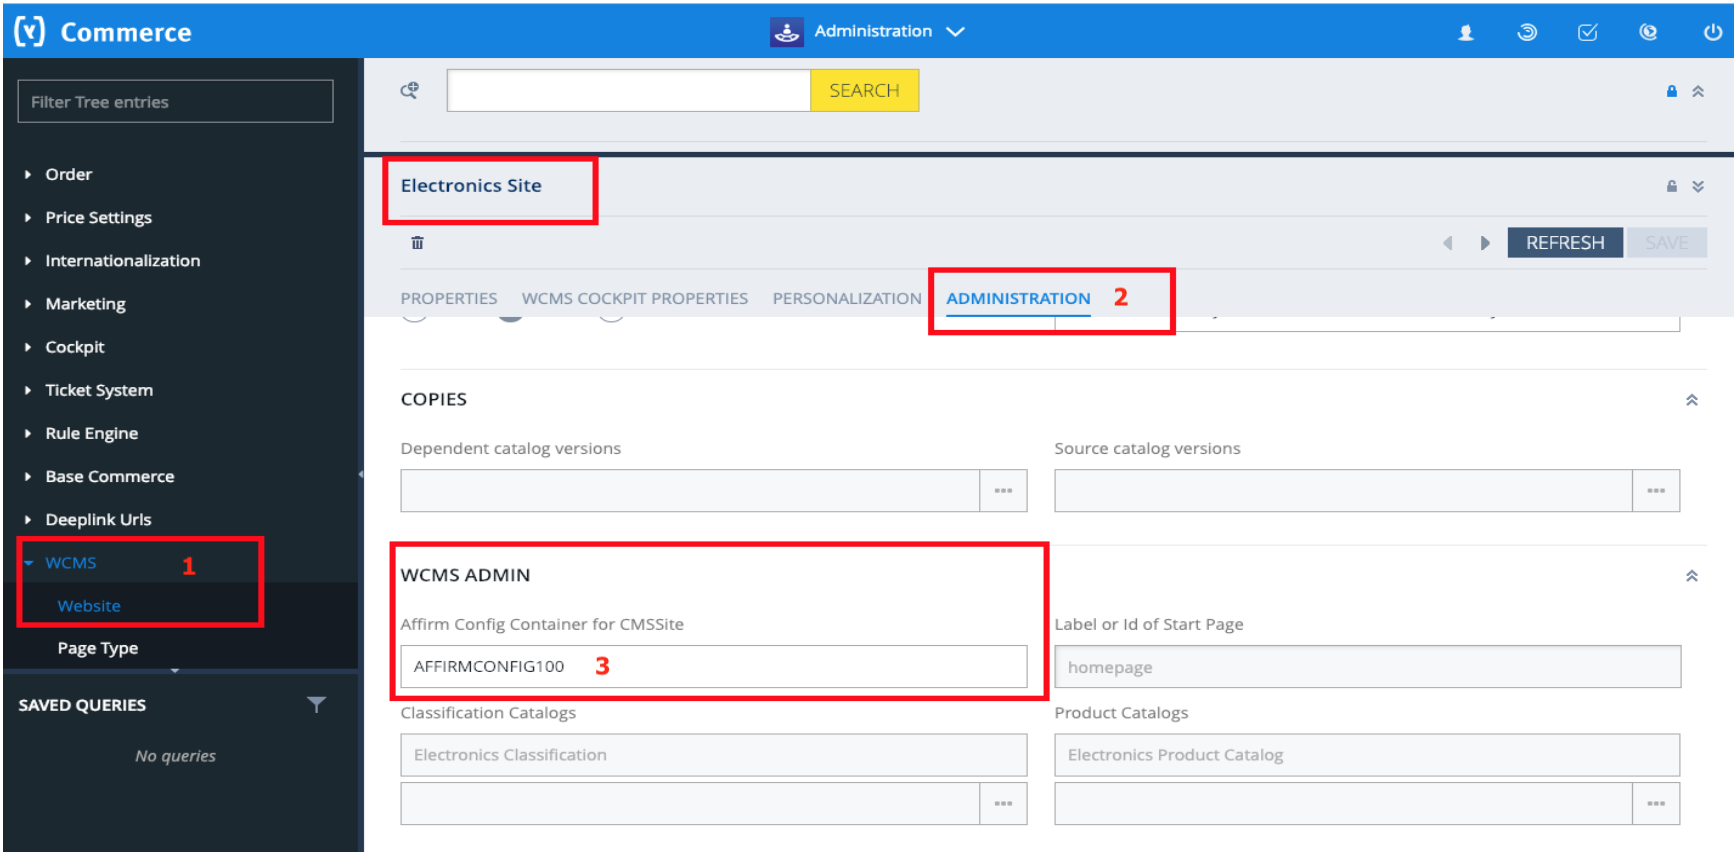
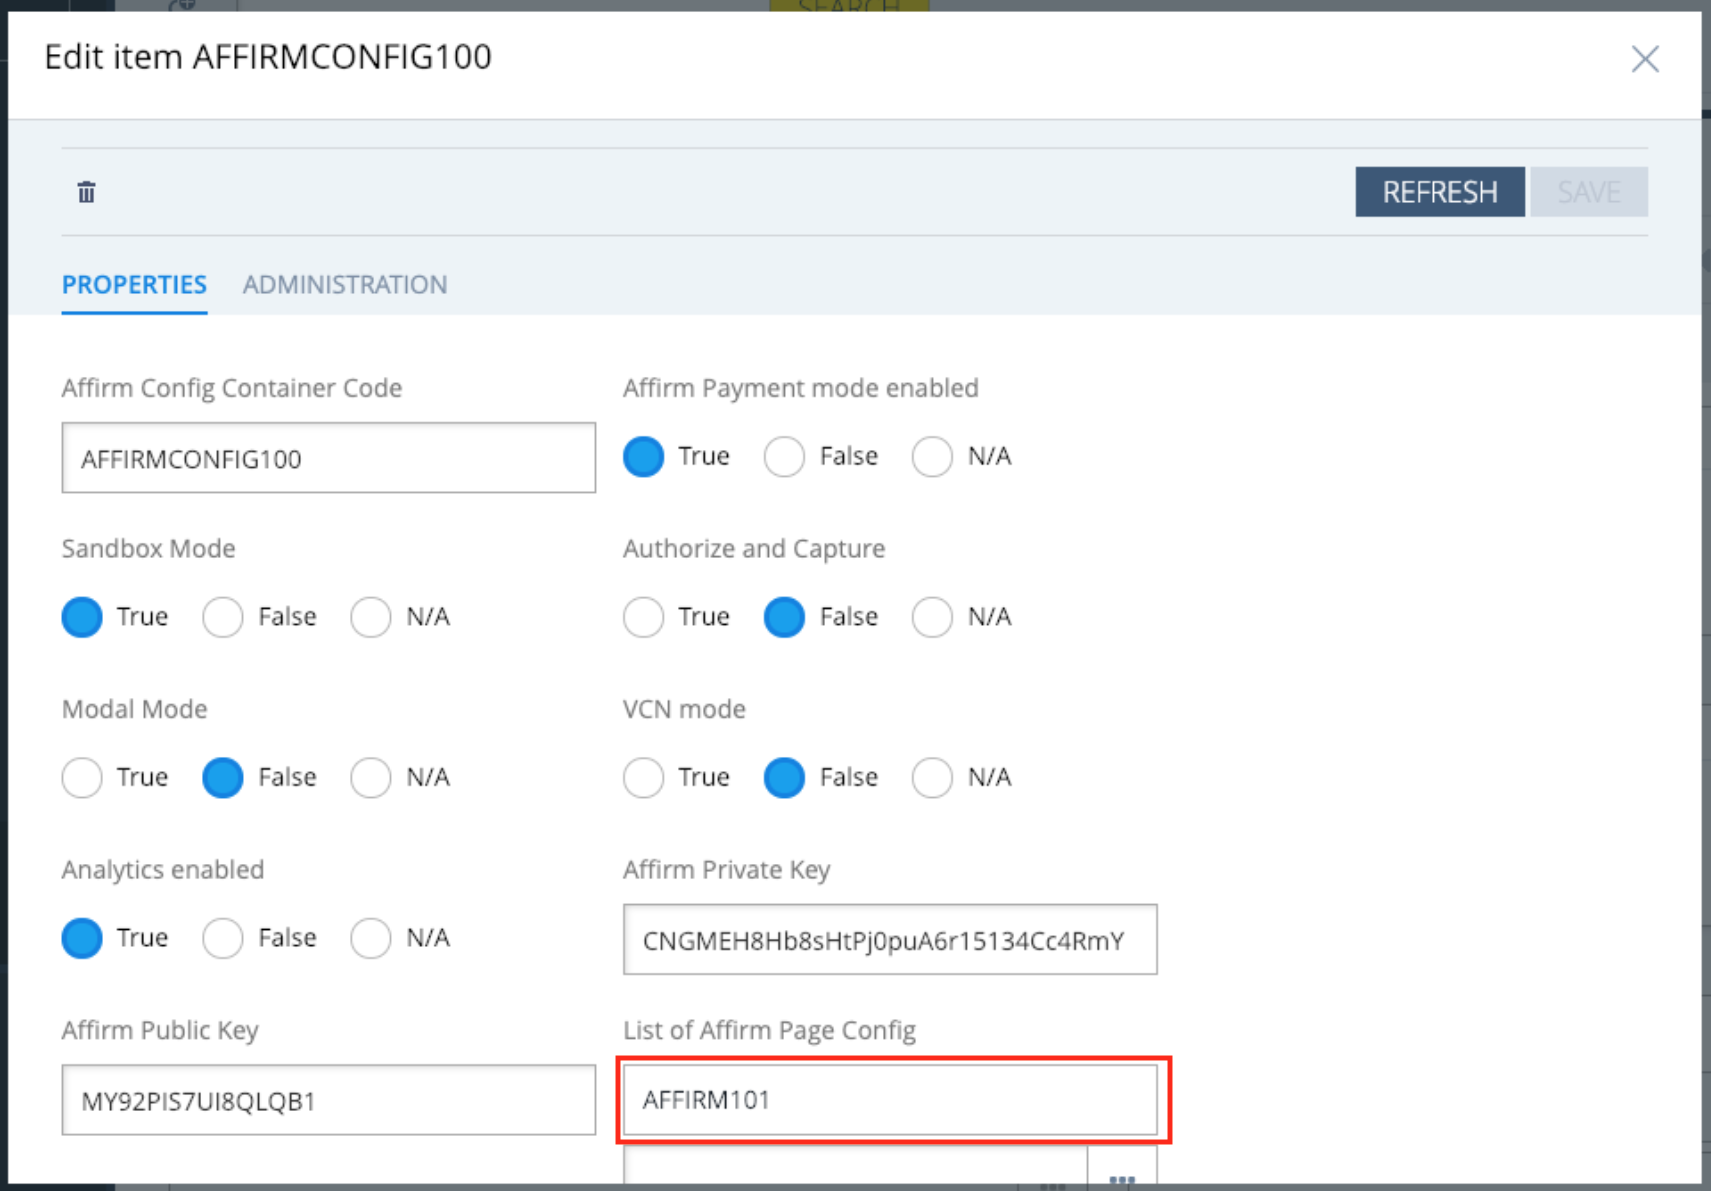
To view or edit the Affirm configuration, within SAP Commerce Backoffice, go to WCMS → Website → ADMINISTRATION → Affirm Config Container for CMSSite.
- Edit Affirm Payments Configuration Fields
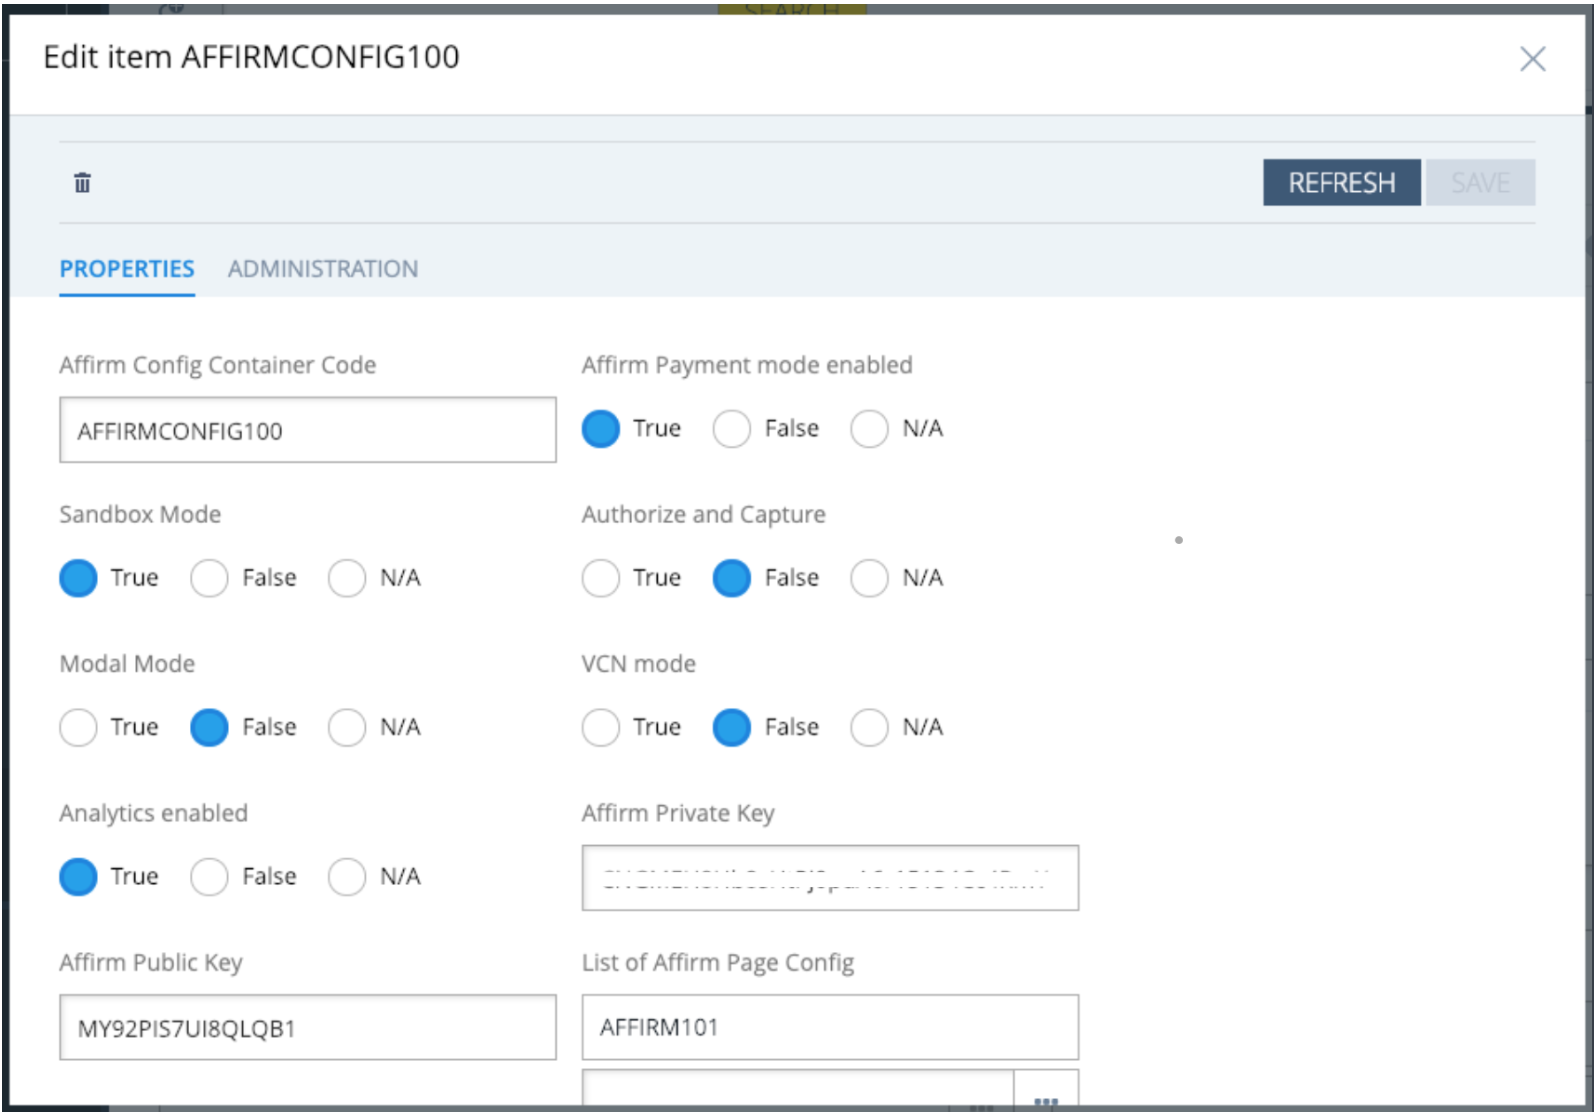
| Attribute | Description |
|---|---|
| Affirm Payment mode enabled | Set to True to enable Affirm as a payment method. |
| Sandbox Mode | Set to True to enable sandbox mode for development and testing. |
| Authorize and Capture | Set to True to automatically capture the payment at the time the order is placed. If set to False, the capture will happen during the fulfillment process. |
| Modal Mode | Set to True to enable modal checkout. Leave "False" to use the default, redirect checkout. |
| VCN mode | Set to True only if you are using Affirm's VCN checkout. |
| Analytics enabled | Set to True to enable Affirm to obtain analytics on the order confirmation page |
| Affirm Private Key | Affirm private API Key (use Sandbox private key if Sandbox Mode is enabled.) |
| Affirm Public Key | Affirm public API Key (use Sandbox public key if Sandbox Mode is enabled.) |
| List of Affirm Page Config. | Click to configure Affirm promotional messaging (outlined in the next section) |
3. Configure Affirm Promotional Messaging
Affirm promotional messaging components---monthly payment messaging and educational modals---show customers how they can use Affirm to finance their purchases. Properly placed promotional messaging helps drive increased AOV and conversion.
Adding Affirm promotional messaging is a required integration step, and you should complete it before testing your integration. Click here for information about adding Affirm promotional messaging.
- Access the Affirm configuration outlined in section 2, go to WCMS → Website → ADMINISTRATION → Affirm Config Container for CMSSite.
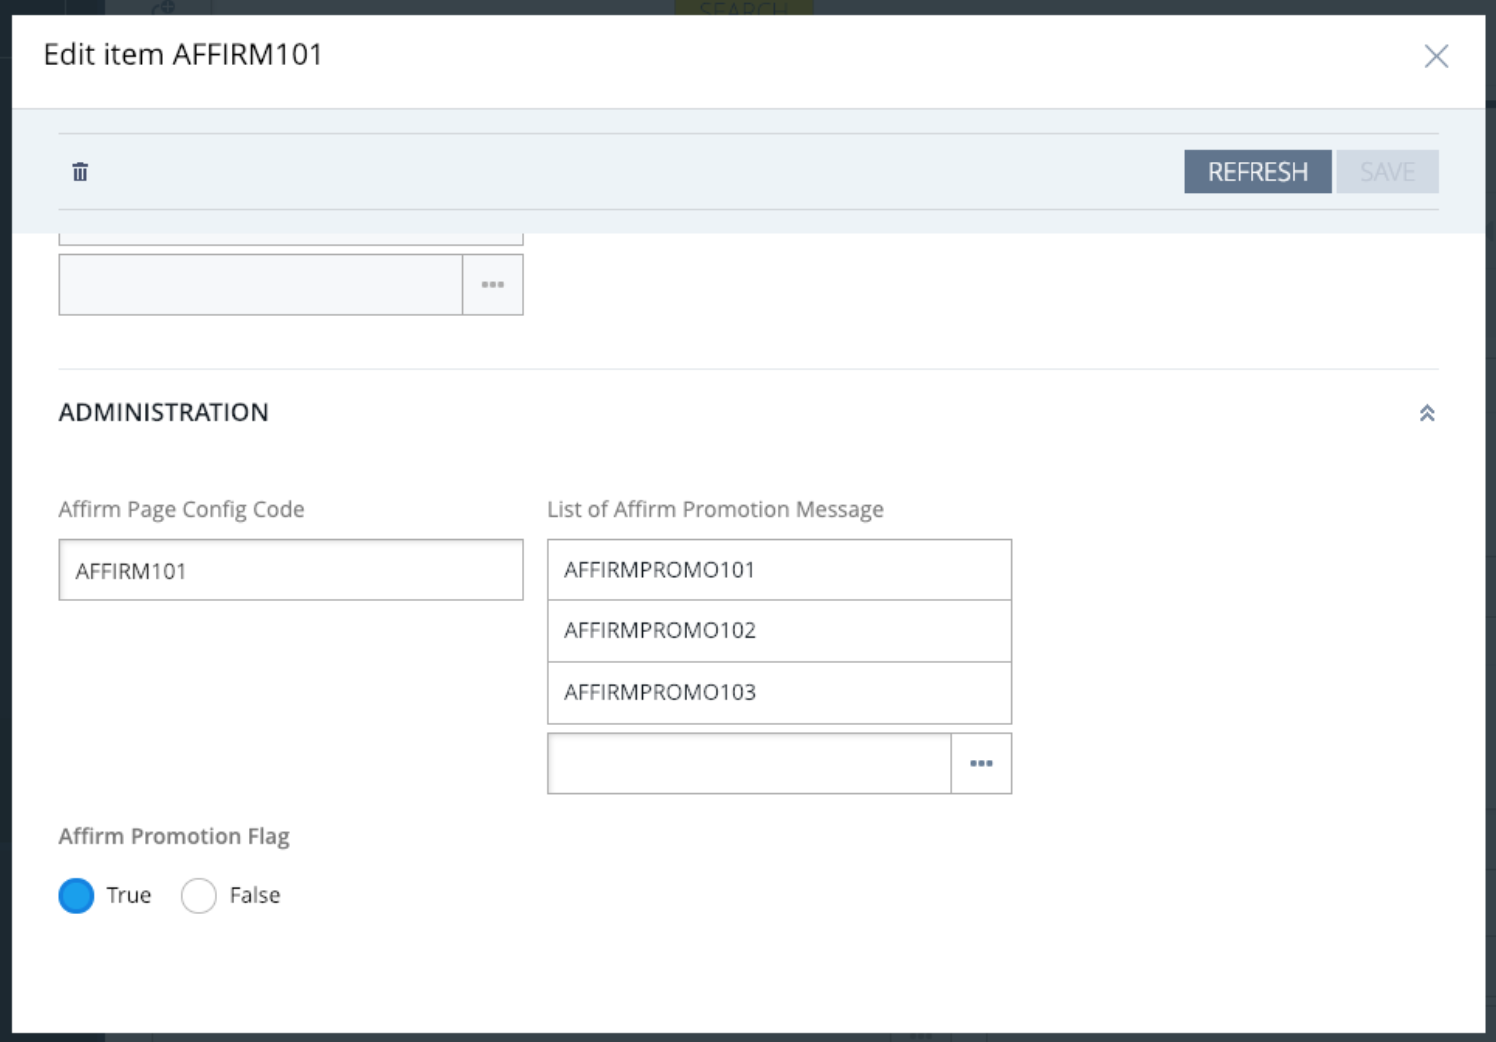
- Double click on the Affirm Page Config.
- To enable Affirm promotional messaging, set Affirm Promotion Flag to
Trueand click Save. Click on a value under List of Affirm Promotion Message for additional configuration.
- Scroll down to the administration settings and click Save to save any edits.
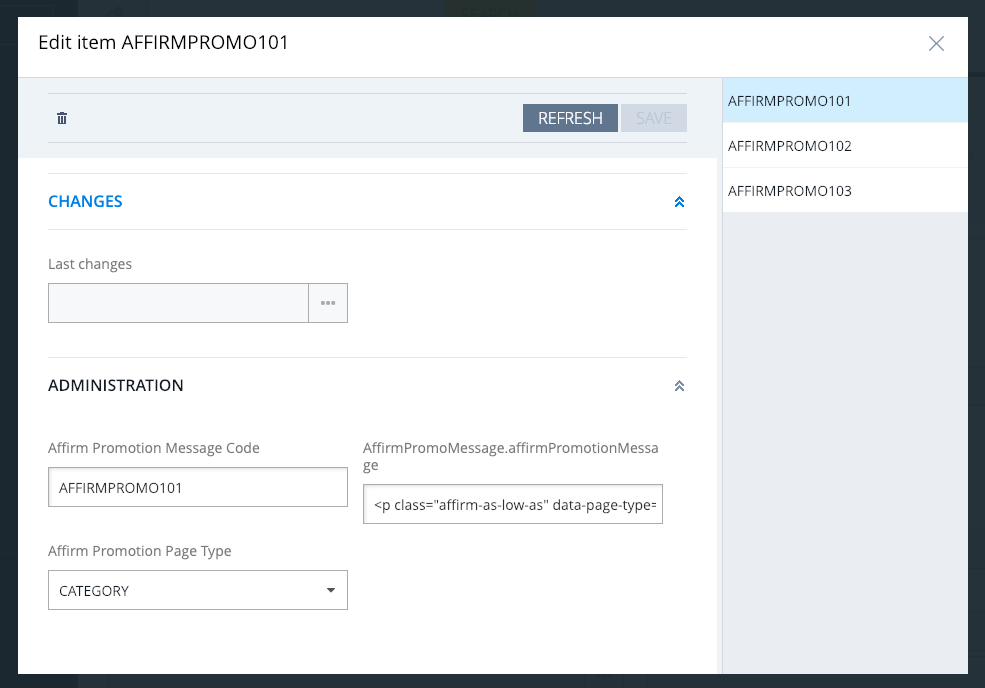
| Attribute | Description |
|---|---|
| Affirm Promotion Message Code | Promotion message code for these settings (should not be edited) |
| Affirm Promotion Page Type | Values are "CATEGORY", "PDP" (for product page), and "CART" page. This value refers to the page that this configuration is for. |
| AffirmPromoMessage.affirmPromotionMessage | Edit this class to update attributes for Affirm's promotional messaging. |
Configuration options (optional)
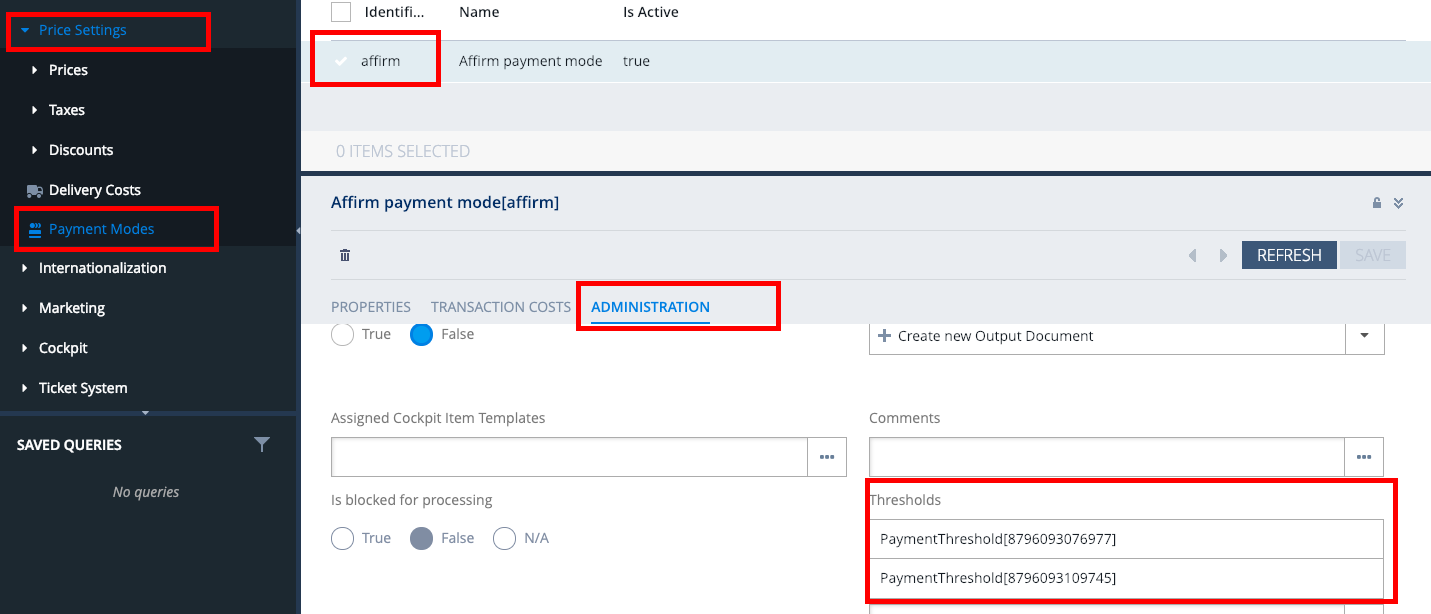
It is possible to restrict Affirm as a payment option on the checkout page based on minimum or maximum cart totals. If you want Affirm to be displayed for all cart thresholds, this step can be skipped.
Step 1
To edit/view thresholds login to Backoffice with admin credentials and navigate to Price Settings -> Payment Modes and select affirm. Select the Administration tab and scroll down to Thresholds settings.
Step 2
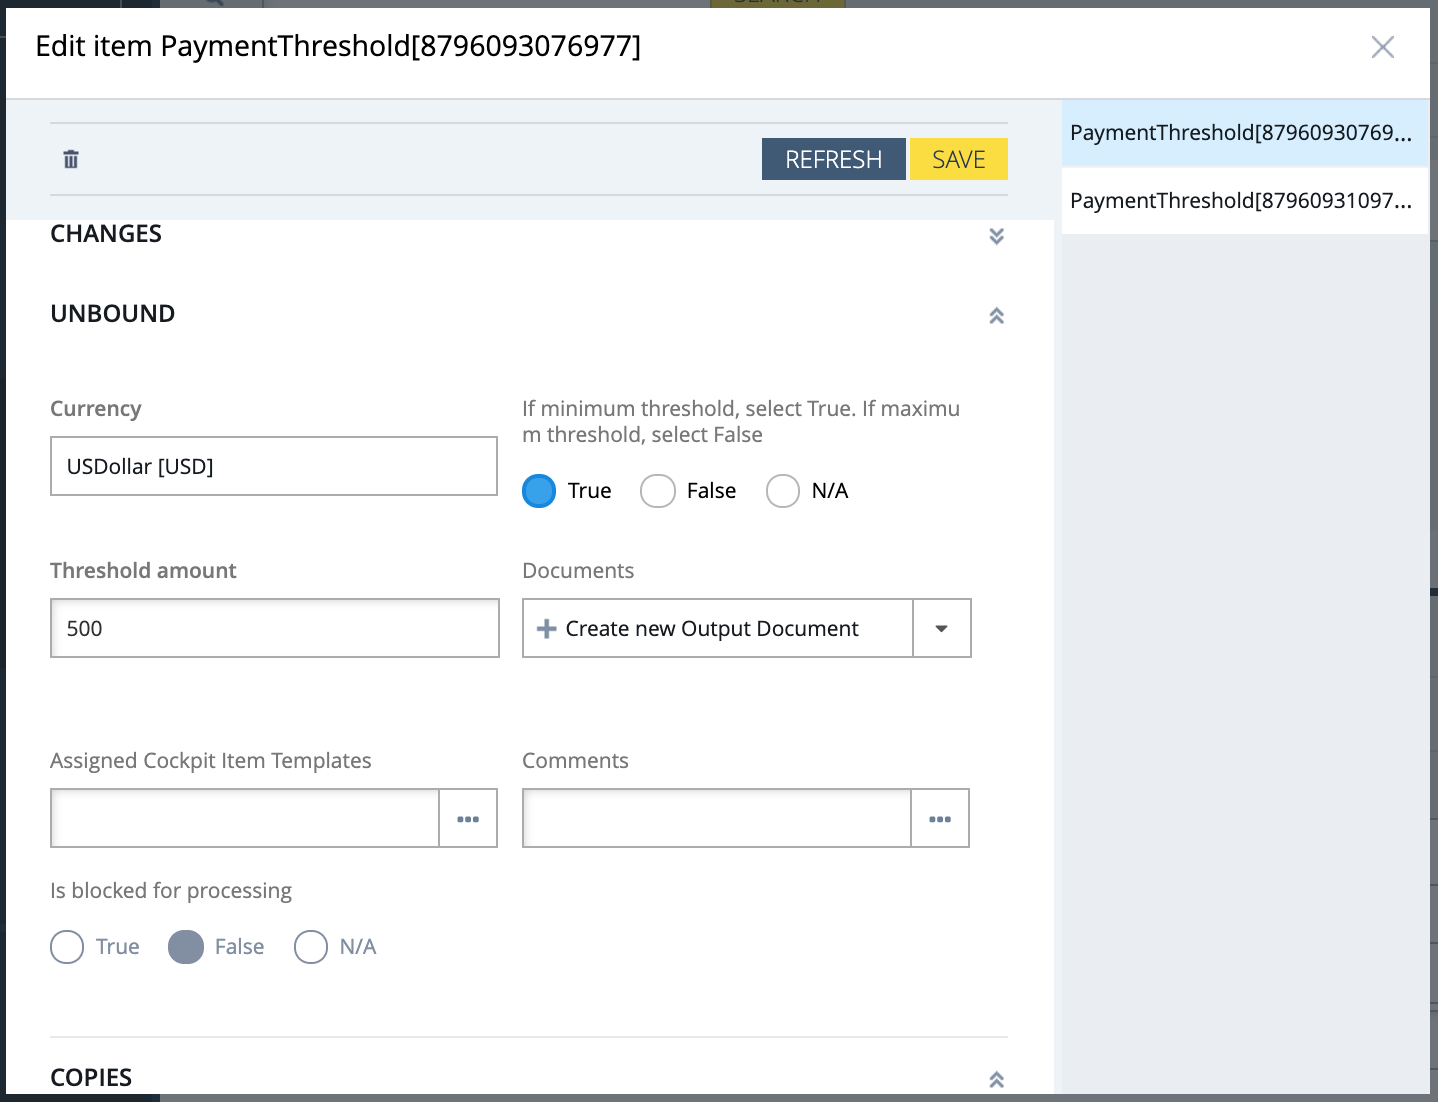
To edit threshold, select the PaymentThreshold object from the list. Select True to set the minimum threshold and False to set the maximum threshold. Set the threshold in the Thresdhold amount field.
Step 3
Review your Order Management functions:
Processing orders (void, refund, and partial refund) in SAP Commerce updates the order status in the Affirm dashboard. While you can process orders in the dashboard, we strongly recommend using SAP Commerce BackOffice to keep order status synced with Affirm.
Step 4
Coordinate testing with Affirm:
Before deploying the Affirm integration to your production site, Affirm will need to test it in your development or staging environment connected to our live environment. Contact your Integration Consultant or [email protected] to coordinate this test.
Step 5
Deploy to production:
Connect to the live Affirm environment
- Retrieve your live API keys at https://affirm.com/dashboard/#/apikeys
- Access the Affirm configuration outlined in section 2, go to WCMS → Website → ADMINISTRATION → Affirm Config Container for CMSSite
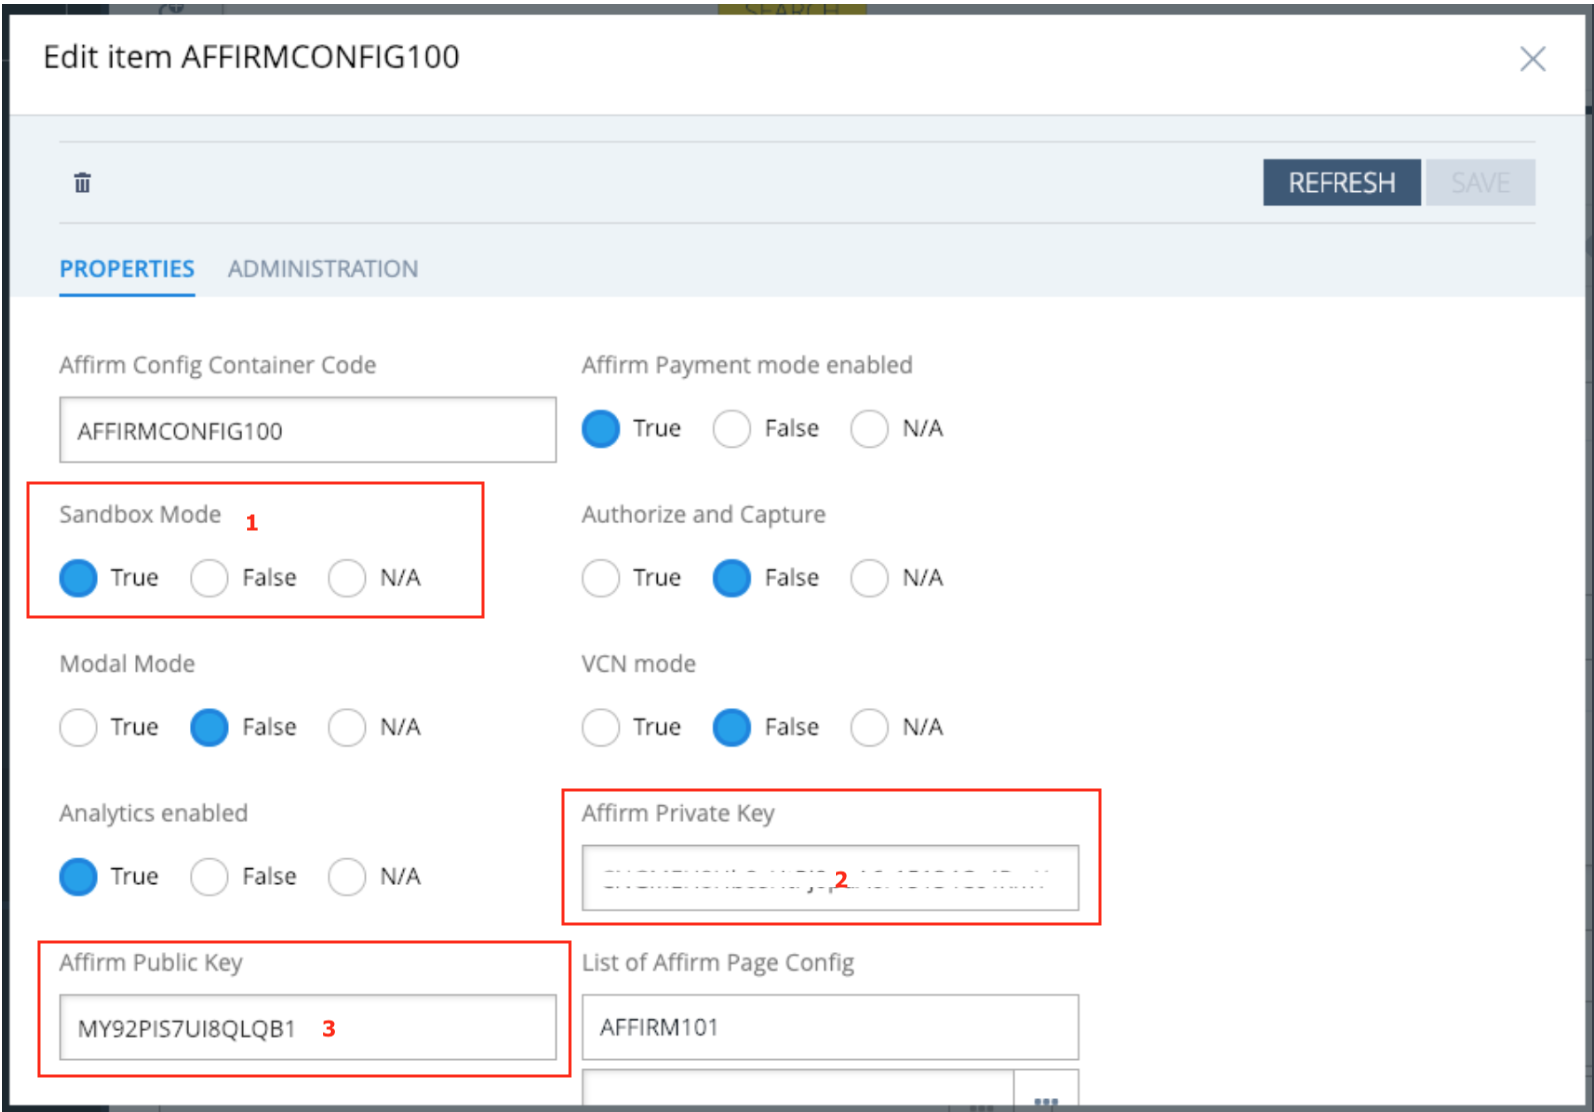
- Set the Sandbox Mode to
False(1) and update the Affirm Private Key (2) and Public Key with the live API keys from your dashboard. Click SAVE.
Launch to Production
After yo have connected to our live environment and we have tested your integration, you are ready to deploy to your production environment and offer Affirm as a payment option to your customers!
Updated 3 months ago
 USA
USA