Affirm Lite Integration Guide

The Affirm Lite integration has made it easier than ever to offer customers a convenient way to pay.

🚧

Affirm Lite 1.0 → Affirm Landing Page Update

If you are looking for the original "Affirm Lite," the product has been renamed to "Affirm Landing Page." This product will continue to function exactly as before, and no changes are required for existing integrations. To review this documentation, please click here.

Overview

This guide walks you through the integration steps of Affirm Lite— a product designed to streamline the implementation process and boost customer conversion. With just three key steps, this straightforward process equips your site with a seamless Affirm checkout experience, enhancing the shopping journey for your customers.


Functionality

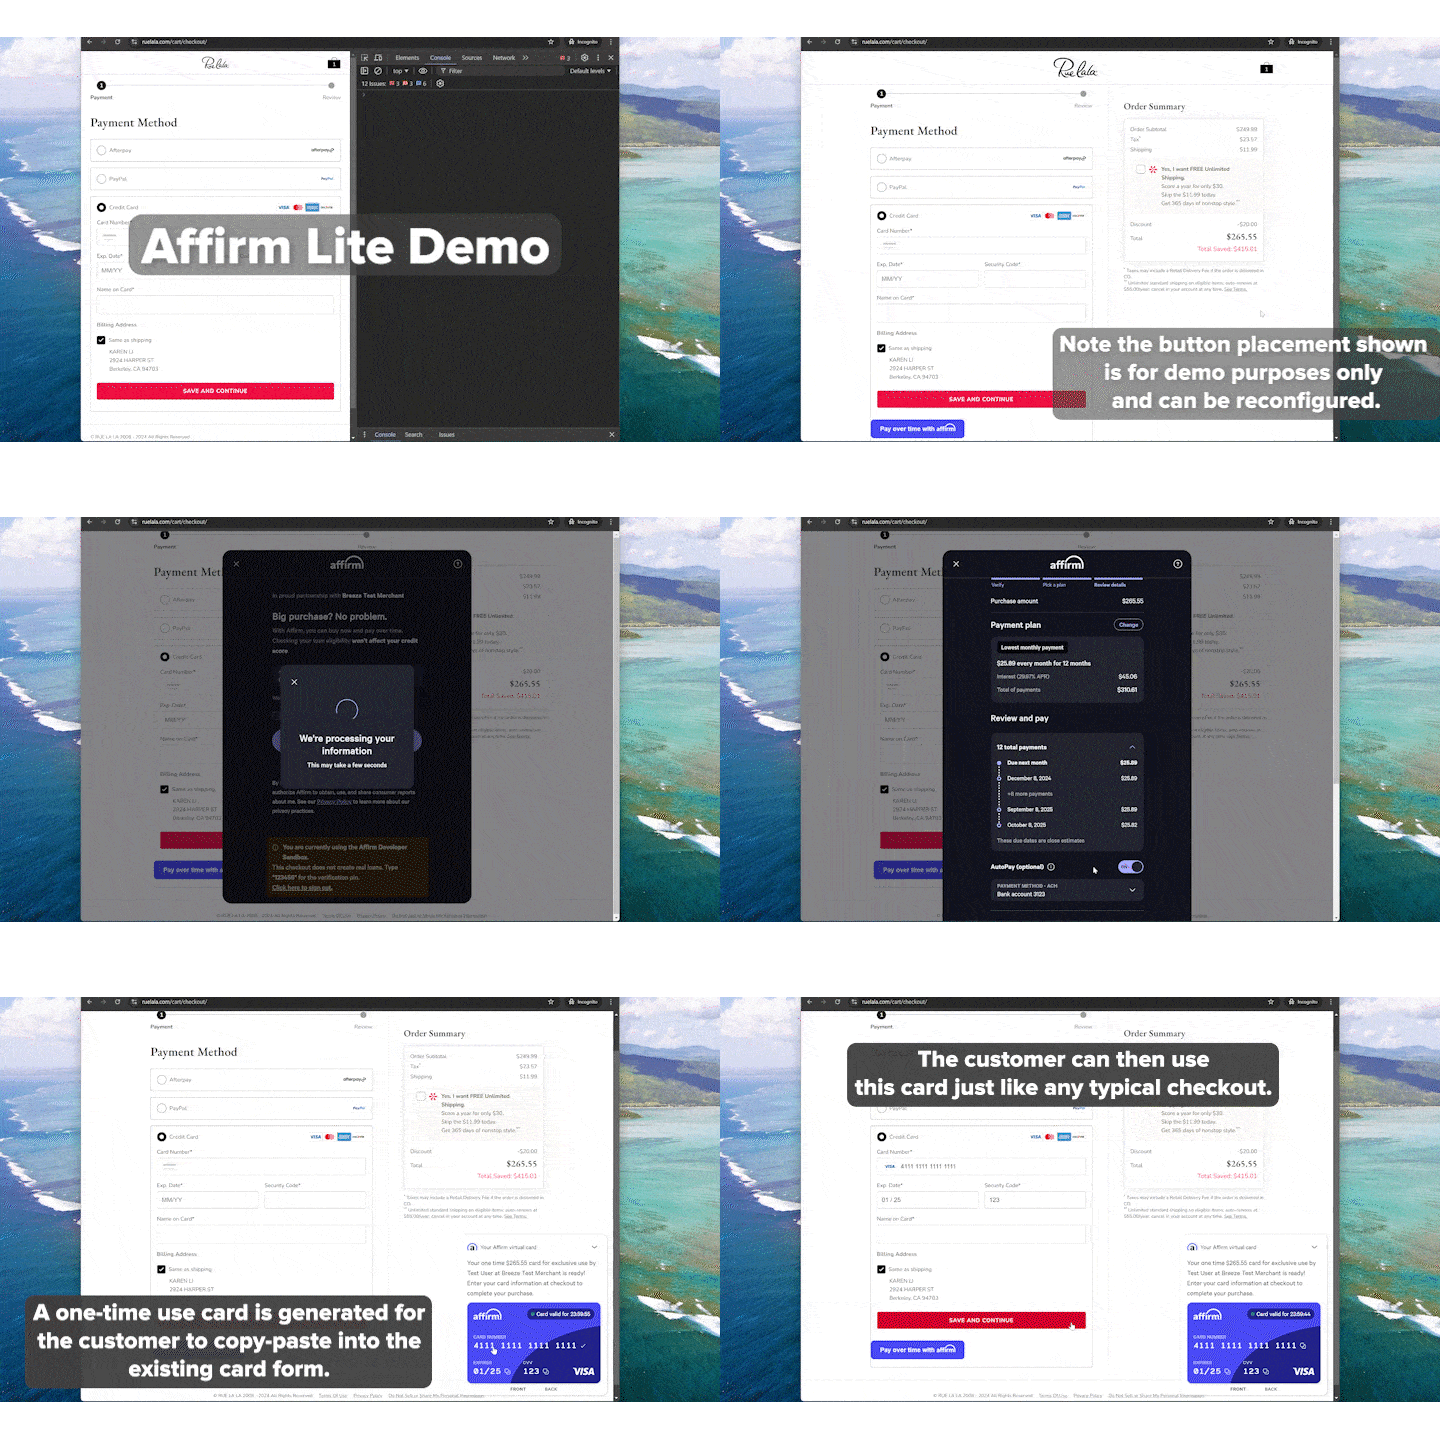
Affirm Lite keeps customers on your checkout page while they use Affirm to complete their purchase, functioning similarly to a widget. When a customer clicks the Affirm Lite checkout button, we display a pop-up window on the existing screen to guide them through the checkout process, resulting in the creation of an Affirm Virtual Card.

After the Affirm Virtual Card is created, card information can be transferred to the respective payment fields in these two ways:

  1. If you are using the query selectors for the Affirm Lite attributes, Affirm can autofill the card number, expiration date, and CVV fields with the Virtual Card’s information. See the Integration Steps section for details.
  2. If autofill is not available, the customer can copy the information directly from the Virtual Card and paste it into the respective fields.

🚧

iframe Autofill Compatibility

If your checkout page uses an iframe, browser security restrictions prevent Affirm Lite from autofilling customer information. As a result, customers must manually input their Affirm Virtual Card details by copying and pasting the information into the respective fields.


Affirm Landing Page Fallback

To ensure a customer can complete their checkout even if Affirm Lite cannot identify a selector, you can use safeguards such as the Affirm Landing Page (previously Affirm Lite) fallback. You can activate this fallback by including the data-fallback-url attribute in your Affirm Lite code.

When you activate the fallback, the customer is redirected to the Affirm Landing Page to continue the checkout process. When the customer completes their purchase, we generate an Affirm Virtual Card. The customer then manually enters their Affirm Virtual Card details on your store's checkout page.


Integration Steps

1. Add AFJS

To activate the Affirm object and use the broader Affirm.js SDK functionalities:

  1. Add the Affirm.js script in the <head> section of your global page.
  2. Initialize Affirm by:
    1. Adding your public API key, which authenticates your website's identity to Affirm, and
    2. Specifying the environment (sandbox or production) that you're targeting.
<script>
var _affirm_config = {
		public_api_key: "YOUR_PUBLIC_API_KEY", /* replace with public api key */
		script: "https://cdn1-sandbox.affirm.com/js/v2/affirm.js",
		locale: "en_US",
		country_code: "USA",
	};

(function(m,g,n,d,a,e,h,c){var b=m[n]||{},k=document.createElement(e),p=document.getElementsByTagName(e)[0],l=function(a,b,c){return function(){a[b]._.push([c,arguments])}};b[d]=l(b,d,"set");var f=b[d];b[a]={};b[a]._=[];f._=[];b._=[];b[a][h]=l(b,a,h);b[c]=function(){b._.push([h,arguments])};a=0;for(c="set add save post open empty reset on off trigger ready setProduct".split(" ");a<c.length;a++)f[c[a]]=l(b,d,c[a]);a=0;for(c=["get","token","url","items"];a<c.length;a++)f[c[a]]=function(){};k.async=
  !0;k.src=g[e];p.parentNode.insertBefore(k,p);delete g[e];f(g);m[n]=b})(window,_affirm_config,"affirm","checkout","ui","script","ready","jsReady");
</script>

2. Add the Affirm Lite Code Snippet

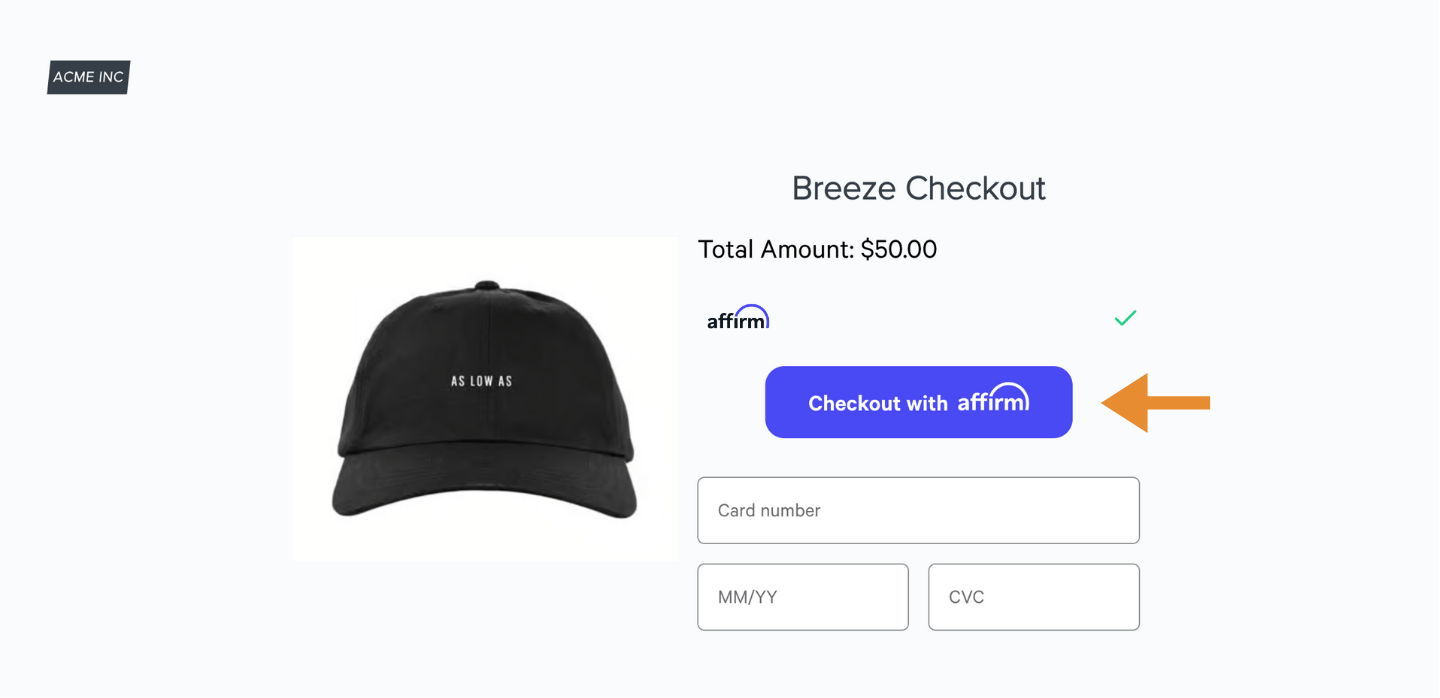
Embed the Affirm Lite code snippet into your HTML as a button that triggers the Affirm checkout experience. Affirm Lite requires an additional checkout button on your checkout page. If you prefer not to design your own button, Affirm provides a pre-styled checkout button. For details, see the Affirm Checkout Button section.

To activate Affirm Lite successfully, you must:

  1. Embed the class "affirm-lite-checkout" within the Affirm Lite button's HTML.
  2. Include the data-total-amount-tag attribute to accurately capture and communicate your customer's checkout cart total to Affirm.
  3. Include the data-fallback-url attribute to redirect customers to Affirm Landing Page if Affirm Lite does not activate.

Affirm Lite Code Snippet

<button
  type="button" 
  class="affirm-lite-checkout"
  data-fallback-url="https://affirm.com/shop/<merchant>"      
  data-total-amount-tag="#amount-tag-dollars" 
  data-cc-number-tag="input[name='cc-number']" 
  data-cc-csc-tag="input[name='cvv']" 
  data-cc-exp-month-tag="input[name='exp']" 
  data-cc-exp-year-tag="input[name='exp']">
    Checkout with Affirm
</button>

Affirm Lite Attributes

AttributeDescription
class= "affirm-lite-checkout"Serves as a locator for Affirm.js to find elements on the page to be transformed into Affirm Lite checkout buttons.
data-fallback-urlEnsures that Affirm Landing Page can be activated as a fallback measure if Affirm Lite is unable to render.
data-total-amount-tagCaptures the cart total and sends that information to Affirm.
data-cc-number-tagIdentifies and automatically populates the Virtual Card’s number into the respective field on your website.
data-cc-csc-tag Identifies and automatically populates the Virtual Card's 3-4 digit security code into the respective field on your website.
data-cc-exp-month-tag Identifies and automatically populates the month of the Affirm Virtual Card’s expiration date into the respective field on your website.

If your site only contains a single field for credit card expiration month and year, provide the same query selector for both attributes, i.e. data-cc-exp-month-tag= “cc-exp” and data-cc-exp-year-tag= “cc-exp”.
data-cc-exp-year-tag Identifies and automatically populates the year of the Affirm Virtual Card’s expiration date into the respective field on your website.

If your site only contains a single field for credit card expiration month and year, provide the same query selector for both attributes, i.e. data-cc-exp-month-tag= “cc-exp” and data-cc-exp-year-tag= “cc-exp”.

3. Identify and Add the HTML Selectors

Use Google Chrome’s Inspect Element feature to identify HTML selectors. Then, enable Affirm to read the cart total and accurately obtain the amount required for the customer’s loan.

Identify the Data-Total-Amount-Tag

  1. On your website's checkout page, locate the area that displays the customer’s cart total.
  1. Right-click on the customer’s cart total and select “Inspect.” This displays the Inspect Element panel.
  1. On the “Elements” tab, locate the highlighted cart total element and identify the element's name. For example, in the screenshot below, the cart total element has an id name of total-amount.
    Note: You can also right-click on the element and select “Copy” > “Copy selector” to get the id name.
  1. Input total-amount in the Affirm Lite code for thedata-total-amount-tag attribute.

Example:

data-total-amount-tag="#total-amount"

Identify the Data-CC-Number-Tag

  1. On your website's checkout page, locate the area that displays the customer’s credit card number.
  1. Right-click on the credit card number area and select “Inspect.” This displays the Inspect Element panel.
  1. On the “Elements” tab, locate the highlighted credit card number element and identify the element's name. For example, in the screenshot below, the credit card number element has an id name of cc-number.
    Note: You can also right-click on the element and select “Copy” > “Copy selector” from the dropdown to obtain the id name.
  1. Input cc-number in the Affirm Lite code for the data-cc-number-tag attribute.

Example:

data-cc-number-tag="#cc-number"

Identify the Data-CC-CSC-Tag

  1. On your website's checkout page, locate the area that displays the credit card’s 3-4 digit security code, Card Security Code (CSC), or Card Verification Code (CVC).
  1. Right-click on the security code area and select “Inspect.” This displays the Inspect Element panel.
  1. On the “Elements” tab, locate the highlighted security code element and identify the element's name. For example, in the screenshot below, the security code element has an id name of cc-csc.
    Note: You can also right-click on the element and select “Copy” > “Copy selector” from the dropdown to obtain the id name.
  1. Input cc-csc in the Affirm Lite code for the data-cc-csc-tag attribute.

Example:

data-cc-csc-tag="#cc-csc"

Identify the Data-CC-Exp-Month-Tag

  1. On your website's checkout page, locate the area that displays the credit card’s expiration month.
  1. Right-click on the expiration month area and select “Inspect.” This displays the Inspect Element panel.
  1. On the “Elements” tab, locate the highlighted expiration month element and identify the element's name. For example, in the screenshot below, the expiration month element has an id name of exp-month.
    Note: You can also right-click on the element and select “Copy” > “Copy selector” from the dropdown to obtain the id name.
  1. Input exp-month in the Affirm Lite code for the data-cc-exp-month-tag attribute.

Example:

data-exp-month-tag="#exp-month"

Note: If your site only contains a single field for credit card expiration month and year, provide the same query selector for both attributes: data-cc-exp-month-tag= “cc-exp” and data-cc-exp-year-tag= “cc-exp”.


Identify the Data-CC-Exp-Year-Tag

  1. On your website's checkout page, locate the area that displays the credit card’s expiration year.
  1. Right-click on the expiration month area and select “Inspect.” This displays the Inspect Element panel.
  1. On the “Elements” tab, locate the highlighted expiration year element and identify the element's name. For example, in the screenshot below, the expiration year element has an id name of exp-year.
    Note: You can also right-click on the element and select “Copy” > “Copy selector” from the dropdown to obtain the id name.
  1. Input exp-year in the Affirm Lite code for the Data-cc-exp-year-tag attribute.

Example:

data-exp-year-tag="#exp-year"

Note: If your site only contains a single field for credit card expiration month and year, provide the same query selector for both attributes: data-cc-exp-month-tag= “cc-exp” and data-cc-exp-year-tag= “cc-exp”.


HTML Attribute Completion

After you identify your HTML selectors, your final code resembles the example below and your integration steps are complete for Affirm Lite:

<button
  type="button" 
  class="affirm-lite-checkout"
  data-fallback-url="https://affirm.com/shop/<merchant>" 
  data-total-amount-tag="#total-amount" 
  data-cc-number-tag="#cc-number" 
  data-cc-csc-tag="#cc-csc" 
  data-cc-exp-month-tag="#exp-month" 
  data-cc-exp-year-tag="#exp-year">
    Checkout with Affirm
</button>

🚧

HTML Query Selector Changes

If any changes are made to your web page, ensure that the query selectors for the Affirm Lite attributes are correct and update them if necessary.

Affirm Checkout Button (optional)

As an optional feature, Affirm created a pre-styled checkout button to further simplify the integration process.

To enable the pre-styled Affirm checkout button, add affirm-checkout-btn to the class containing the affirm-lite-checkout.

Example:

<button
  type="button" 
  class="affirm-lite-checkout affirm-checkout-btn"
  data-fallback-url="https://affirm.com/shop/<merchant>"      
  data-total-amount-tag="#amount-tag-dollars" 
  data-cc-number-tag="input[name='cc-number']" 
  data-cc-csc-tag="input[name='cvv']" 
  data-cc-exp-month-tag="input[name='exp']" 
  data-cc-exp-year-tag="input[name='exp']">
    Checkout with Affirm
</button>

Button Customizations

There are two options for the pre-styled Affirm checkout button:

  • Default: affirm-checkout-btn which displays the button with a blue background and white text.
  • Light: affirm-checkout-btn btn-light which displays the button with a white background, blue border, and black text.