Using the Promotional Messaging App for Shopify
Learn about the Affirm promotional messaging app for Shopify.
Country Availability
 USA
USA
 Canada
Overview
With the Affirm pay-over-time promotional messaging app, you can easily configure how Affirm’s "As Low As" messaging appears on your site without needing to directly edit your theme files.
Editing your theme filesIf you are looking for additional customization options, feel free to directly edit your theme files.
Integration Steps
1. Install the Affirm App
To install and setup the Affirm Messaging App:
- Navigate to the Affirm page in the Shopify app store.
- Click the Add app button to install the Affirm pay‑over‑time messaging app.
- On the app overview page, click Install app. You can also view additional details about how the app impacts settings for your site.
- Sign into your Affirm Dashboard with Google, or use your email and password. This redirects you to the Affirm App within Shopify.
- Go to Shopify admin > Apps to verify the app installation. You should see the Affirm app installed.
- Click the Enable button.

2. Configure Pay-over-time Message
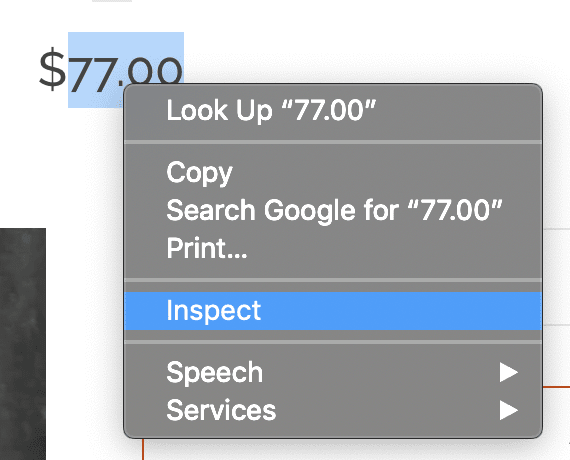
This process involves inspecting the various elements on your product, collection, and cart pages.
How to inspect the element
To inspect an element, such as your product price, simply right-click on the desired element and select Inspect from the dropdown menu.
This opens the inspector and highlights the particular element you have selected in your site’s source code. In the product price example below, you will see that when inspecting the price on the page, the text content within your source code is surrounded by an element with the class product-price - this class name is what we are looking for.
Example
| Highlight the element | Inspect the element |
|---|---|
 | 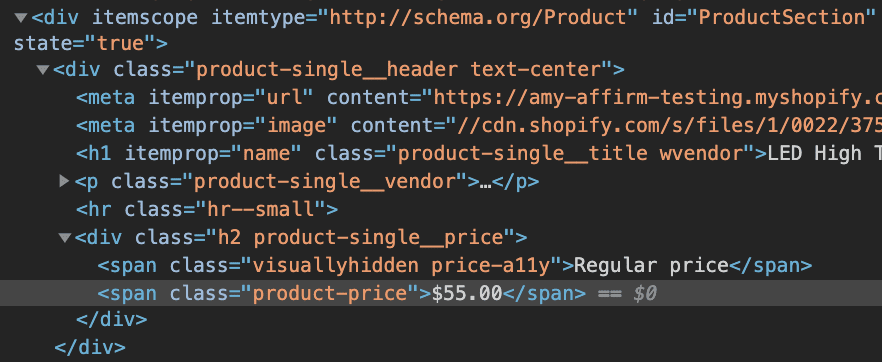 |
The fields within the app will require either a class or an ID. IDs can be found using the same approach. In this case, you will look for an instance of id=”...” rather than class=”...”.
How to Format the Settings

If the element has an ID, use the hashtag (#) before the name.

If the element has a class, use the period (.) before the name.
Product Elements

Accessing Product Elements
To access Shopify's product elements, you must be logged in to your Merchant Dashboard. Once you are logged in to your Merchant Dashboard you will then navigate to the Affirm app in Shopify (Shopify > Apps > Affirm pay-over-time messaging) and review the product elements.
1. Inspect the Element
For these steps, you will need to use the method above to inspect various elements on the page.
2. Find the Message Element class or ID:
The Message Element determines the location of the promotional message on the page. Locate where you want to place the message and inspect the nearest element on the page; it is usually the price or your add to cart button. Determine the class or ID for this element and add it to the Message Element field using the formatting detailed in the section above.
3. Find the Form Element class or ID
The Form Element ensures the promo price updates when your product variants change. Hover your mouse over your product variant options and open the inspector. Here, you will look for a specific type of element with the <form … > tag. This Form Element will have a class or ID as well - this is what you will input into the app fields using the same formatting as before.
4. Add to Settings
If the element has an ID, use the hashtag (#) before the name. You can find an example below.
If the element has a class, use the period (.) before the name. You can find an example below.
Using the Advanced Settings
If the Form and Message Elements do not seem to be working, you can use the advanced settings to configure your promotional messaging as well.
Elements
| Element | Description |
|---|---|
| Price | Inspect the price on your page and identify the nearest class or ID. This will generally be within the same element as the price (like in the above example) or in the element just above it. |
| Price Change | This field ensures the promo price updates when your product variant is changed. Inspect the price and scroll up the source code until you locate the nearest ID to the price element. The Price Change Element requires an ID so remember to format with the ‘#’ as noted in the steps above. |
| Sales Price | Sometimes when an item is on sale, a separate class is used to identify the sales price. Locate a sale item on your site and inspect the sale price. If a class is present within the price element that does not appear when the item is at full price, add this class to the Sales Price Element field. Otherwise, this field should be left blank. |
Checkboxes
| Checkbox | Description |
|---|---|
| Compare Prices | If no unique sale price class is present, you can check this box to ensure the app targets the correct price when an item is on sale. Do not use this feature if your price displays a percent discount or ‘amount saved’ message. |
| Add Cents | This is used when using the price element and the price does not already have the cents displayed. |
Page Type
| Page Type | Description |
|---|---|
| Shopify | This is used to confine a message to a specific page type in Shopify. You can find the page type by using meta.page.pageType command in the console on the page that you want to see the message. |
Add or Remove Messaging
You can include additional pay-over-time messaging as well as delete existing messaging.
Add New Messaging
To add new messaging, click the Add New Pay-over-time Message button. This will add an additional Pay-over-time Message box. Follow the instructions in step 2 to configure the messaging.
Delete Existing Messaging
Click the Delete on the applicable messaging you would like to remove.

If your Shopify theme does not use separate elements for regular and sale prices, compare prices will compare all prices within the price element and use the lowest price
Updated 4 months ago