Install and configure Affirm for Kibo
This guide walks you through configuring Affirm at checkout in Kibo.
Install Affirm on Kibo
To install the Pay with Affirm Application by Kibo eCommerce on your site, build the application from GitHub. It is recommended that you work with a professional services partner when doing so.
NoteBuilding the application requires that you have
Arc.jsinstalled on your site. Talk to your Kibo services representative for more information.
Update your Kibo theme
After installing Affirm, you'll need to merge the Affirm theme with your current Kibo theme. This adds the Affirm payment option during checkout and adds Affirm promotional messaging on your product and cart pages.
1. Download the Affirm theme.
2. Review and apply the changes to your current Kibo theme.
3. Install the updated Kibo theme to the sandbox.
4. On the Kibo admin page, go to Main > Site Builder > Themes.
5. Click the options menu (3 horizontal dots) and click Apply.
Configure Affirm
1. Sign in to your Kibo admin portal.
2. Go to System > Settings > Payments.
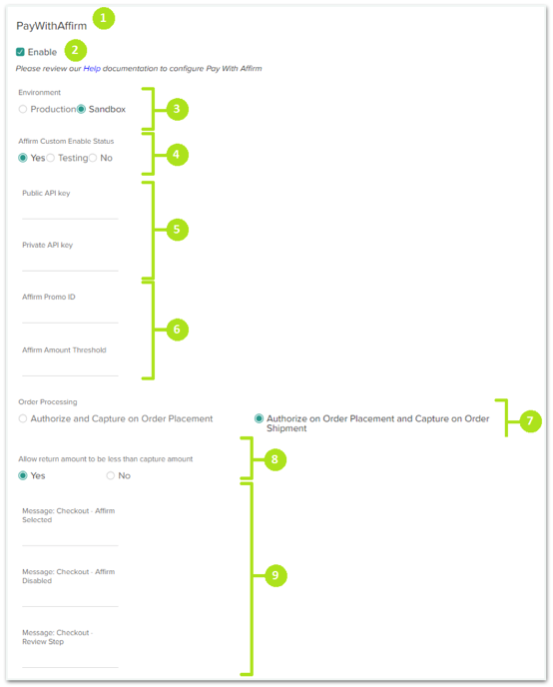
3. In the PayWithAffirm section, click Enable.
4. Set Environment to Sandbox (for development and testing).
5. Set Affirm Custom Enable Status to:
- Yes to enable promotional messaging and the Affirm checkout payment option
- Testing to enable promotional messaging and the Affirm checkout payment option only when the URL includes the parameter
affirm.test=true
6. Enter the Public API Key and Private API Key you retrieved from the Affirm sandbox merchant dashboard.
7. You can optionally enter a Promo ID value in Affirm Promo ID and a minimum order value that displays Affirm as a payment option to your customers during checkout in Affirm Amount Threshold (the Affirm Client Success team provides both values).
8. Set Order Processing to:
- Authorize and Capture on Order Placement to authorize and capture payment when a customer places an order
- Authorize on Order Placement and Capture on Order Shipment to authorize payment when a customer places an order, but captures the payment only when the order ships
9. Set Allow refund amount to be less than capture amount to
- Yes to enable partial refunds
- No to ensure that the refund amount always equals the captured amount
10. In Message: Checkout - Affirm Selected, enter the message shown on the checkout page when the customer selects Affirm (entering no message displays,"Continuing will take you to the Review Order page. You will then be redirected to Affirm to securely complete your purchase.").
11. In Message: Checkout - Affirm Disabled, enter the message shown on the checkout page when the Affirm option is not available because the order amount does not exceed the Affirm Amount Threshold (entering no message displays, "Monthly Payments with Affirm for single-item carts ${0}+").
12. In Message: Checkout - Affirm Selected, enter the message shown in the checkout review step after the customer selects Affirm in the previous step (entering no message displays, "You will be redirected to Affirm to securely complete your purchase. It's quick and easy--get a real-time decision!").
13. Click Save.
14. In the Kibo admin main page, go to System > Customization > Applications.
15. Select the Affirm Payments application.
16. Click Enable App.

Use Multiple Financing Programs
Multiple Financing Programs (MFPs) allow you to offer custom financing programs to your customers based on rules you define in Kibo. To learn more about MFPs and how to set them up in Kibo, contact your Client Success Manager.
Review your order management functions
Processing orders (authorize, void, refund, and partial refund) in Kibo updates the order status in the Affirm dashboard. While you can process orders in the dashboard, we strongly recommend using Kibo to keep order status synced with Affirm. For more information on processing orders in Kibo, refer to their documentation.
Add the Confirmation Page function
When a customer completes their purchase, you can send their order and product information to Affirm for A/B testing, which will help you optimize your site. Send this information by adding the Confirmation Page function to your payment confirmation page. We only require orderId, total, productId, and quantity for A/B testing.
Click here for all the Confirmation Page function parameters.
affirm.analytics.trackOrderConfirmed({
    "paymentMethod": "Visa",
    "orderId": "T12345",
    "total": 3739
}, [{
    "productId": "SKU-1234",
    "quantity": 1
}, {
    "productId": "SKU-5678",
    "quantity": 1
}]);
Required function parameters
Order object
| Attributes | Type | Description |
|---|---|---|
| paymentMethod | string | The payment method chosen by the customer (e.g., Visa). Maximum 150 characters. |
| orderId | string | Your internal unique identifier representing the order. Maximum 500 characters. |
| total | integer | The total amount of the transaction, including tax and shipping, stated in USD cents (e.g., $100 = 10000). |
Product object
| Attributes | Type | Description |
|---|---|---|
| productId | string | Your internal unique identifier representing the product, such as the SKU or an internal database identifier. Maximum 500 characters. |
| quantity | integer | The quantity of the purchased product. |
Coordinate testing with Affirm
Before deploying the Affirm integration to your production site, Affirm will need to test it in your development or staging environment connected to our live environment. Contact your Integration Consultant or [email protected] to coordinate this test.
Deploy to production
Connect to the live Affirm environment
1. Retrieve your live API keys at https://affirm.com/dashboard/#/apikeys
2. In the Kibo admin portal, go to System > Settings > Payments
3. Set Environment to Production
4. Enter the Public API Key and Private API Key you retrieved from the Affirm merchant dashboard
Launch to production
After you've connected to our live environment and we've tested your integration, you're ready to deploy to your production environment and offer Affirm as a payment option to your customers.
Updated 3 days ago