Global Affirm Integration Guide
This step-by-step guide outlines how to implement global integration powered by Affirm APIs.
Aperçu
Affirm's global integration enables you to deploy Affirm in multiple countries and regions by utilizing a universal domain global.affirm.com and API schema. The introduction of a universal domain provides a seamless expansion into international markets.
Intégration R.-U.For merchants utilizing Affirm's UK Integration, please review our step-by-step guide.
How It Works
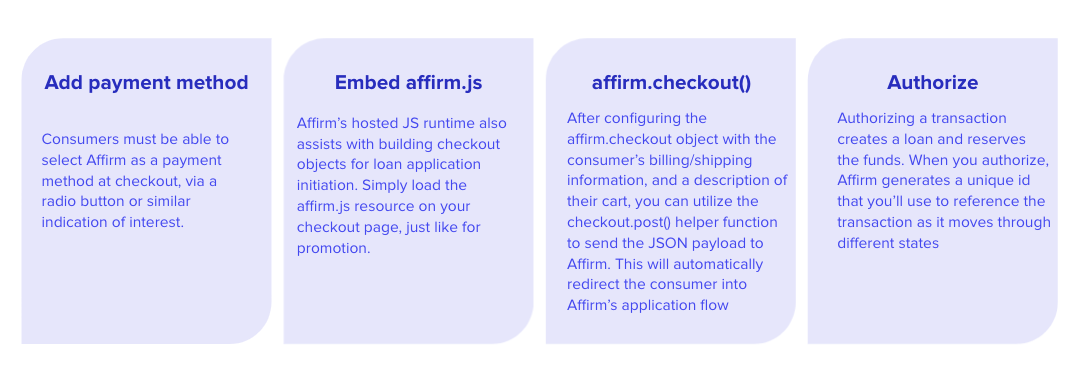
There are four steps to initiate the Affirm application:

Une fois que le client a sélectionné Affirm au moment du paiement, le processus de paiement commence.
Étape 1 : Intégrer Affirm.js
The integration with Affirm.js used for promos and checkout provides a quick and simple way to implement interactive components of Affirm to your platform. Our global integration features extended parameters to reach international customers, which consist of an exposed locale and country_code field in the Affirm config.
Due to international regulations, customizing Affirm's promotional messaging is prohibited.For Affirm hosted promos, changing or hard coding parts of the Affirm promotional messaging language is prohibited and any additional customizations outside of what is listed below must be made by Affirm or have explicit approval from Affirm's compliance team. Please reach out to your Client Success Manager with any additional questions.
public_api_key
The API keys differ for each country. Currently, the following countries are represented by individual API keys:
- The United States
- Canada
Clés APIPlease ensure that the correct API keys are being used for your region.
Locale
The locale parameter enables Affirm to identify which locale you are serving your site in for any particular user. For example, you're rendering your site in Canadian French because the user's browser setting detected Canadian French. You can provide Affirm with the user's language setting by passing it in the locale parameter. Affirm then reads the locale and translates the pages accordingly, thus, matching the language the user sees on your site. We do not attempt to read the user's locale directly.
Country_code
The country_code parameter represents the country of legal incorporation of your store, which is shown to any given user. So, if you are showing your Canadian website/store to a user and you have a legal presence in Canada, you pass CAN into the country_code parameter. This enables Affirm to determine which regulations to abide by and which banks to partner with for this transaction.
Affirm's Identity CheckIn the above scenario, if the user doesn't turn out to be a Canadian resident later in the Affirm checkout flow, they won't pass Affirm's identity check; they are ineligible to receive an Affirm loan.
Additionally, Affirm expects an “Alpha 3” three-letter country code for this parameter. If nothing is sent, Affirm uses "USA".
Valeurs prises en charge
Affirm supports the following combinations for these arguments:
| Country_code | Locale | Country default locale |
|---|---|---|
USA | en_US | en_US |
CAN | en_CA | fr_CA | en_CA |
When a:
localeis not provided, thelocaleautomatically usesen_US(English speaking US).country_codeis not provided, thecountry_codeautomatically usesUSA.
Inclure le script Affirm.js
The script (as shown below) must be included in the <head> section on every page of your site.
You can use the following URLs for the AFJS script:
Sandbox: https://cdn1-sandbox.affirm.com/js/v2/affirm.js
Production: https://cdn1.affirm.com/js/v2/affirm.js
<script>
	_affirm_config = {
		public_api_key: "{YOUR_PUBLIC_API_KEY}",
		script: "https://cdn1-sandbox.affirm.com/js/v2/affirm.js",
		locale: "fr_CA",
		country_code: "CAN",
	};

(function(m,g,n,d,a,e,h,c){var b=m[n]||{},k=document.createElement(e),p=document.getElementsByTagName(e)[0],l=function(a,b,c){return function(){a[b]._.push([c,arguments])}};b[d]=l(b,d,"set");var f=b[d];b[a]={};b[a]._=[];f._=[];b._=[];b[a][h]=l(b,a,h);b[c]=function(){b._.push([h,arguments])};a=0;for(c="set add save post open empty reset on off trigger ready setProduct".split(" ");a<c.length;a++)f[c[a]]=l(b,d,c[a]);a=0;for(c=["get","token","url","items"];a<c.length;a++)f[c[a]]=function(){};k.async=
  !0;k.src=g[e];p.parentNode.insertBefore(k,p);delete g[e];f(g);m[n]=b})(window,_affirm_config,"affirm","checkout","ui","script","ready","jsReady");
</script>
Once you add Affirm.js to your site, you gain access to methods within the Affirm object which then triggers multiple actions.
Step 2: Render Affirm Checkout
When using Affirm.js, merchants pass a checkout object during the checkout flow. You can create a checkout object and launch the Affirm checkout by using the affirm.checkout() function.
For the global integration, merchants pass an extended International Checkout Object. This schema can be used for all Affirm supported countries. See the extended fields in the example below:
For "address", the expanded fields are:
street1street2(optional)region1_codepostal_code
Ensure the following field is accurately populated within the root of the checkout object:
currency
Affirm.checkout() Function
Calling the affirm.checkout() function initiates the following actions:
- Send the checkout object to the Affirm backend.
- Redirect the customer to the Affirm checkout process on the Affirm domain or show them an Affirm modal.
- Validate the required data in the checkout object.
Additionally, configure the checkout object with the following items:
- A
user_confirmation_urlto redirect your customer to a confirmation page after they confirm their loan. - A
user_cancel_urlto redirect your customer to a cancellation page if they do not complete their loan application. - Adresse de facturation/d'expédition du client.
- A description of their cart.
{
  "merchant": {
    "public_api_key": "{PUBLIC_API_KEY}",
    "user_cancel_url": "https://www.google.com",
    "user_confirmation_url": "https://www.affirm.com",
    "user_confirmation_url_action": "POST",
    "name": "Quebec Shoes"
  },
  "shipping": {
    "name": {
      "full": "John Doe"
    },
    "address": {
      "street1": "4519 Rue Levy",
      "street2": "Apt 1",
      "city": "Saint-Laurent",
      "region1_code": "QC",
      "postal_code": "H4R2P9",
      "country": "CAN"
    },
    "phone_number": "250-555-0199",
    "email": "[email protected]"
  },
  "items": [
    {
      "sku": "SKU-1234",
      "item_url": "https://www.quebecshoes.com/shop",
      "display_name": "Grey Sneakers",
      "unit_price": 42500,
      "qty": 1
    }
  ],
  "order_id": "00de5cee-7226-4aec-b729-a571f773a58c",
  "shipping_amount": 2500,
  "tax_amount": 5000,
  "total": 50000,
  "currency": "CAD"
}
The code for currency is an ISO 4217 international currency code.
Étape 3 : Gestion des rappels
After you initiate a checkout and the customer confirms their Affirm loan, we send an HTTP request with the checkout_token to the URL you defined in the checkout object (user_confirmation_url). By default, Affirm sends this request via POST. However, you can configure the checkout object to have Affirm send this request via GET.
You choose how we send the checkout_token by setting the user_confirmation_url_action parameter in the checkout object.
- Setting it to
POSTsends thecheckout_tokenin the body of theHTTPrequest (default setting). - Setting it to
GETsends thecheckout_tokenin the query string of theHTTPrequest.
Paiement modalVous pouvez également récupérer le site Web
checkout_tokenà partir d'un rappel javascript si vous définissez les métadonnéesmodeàmodal. En savoir plus sur la caisse modale.
Step 4: Authorize
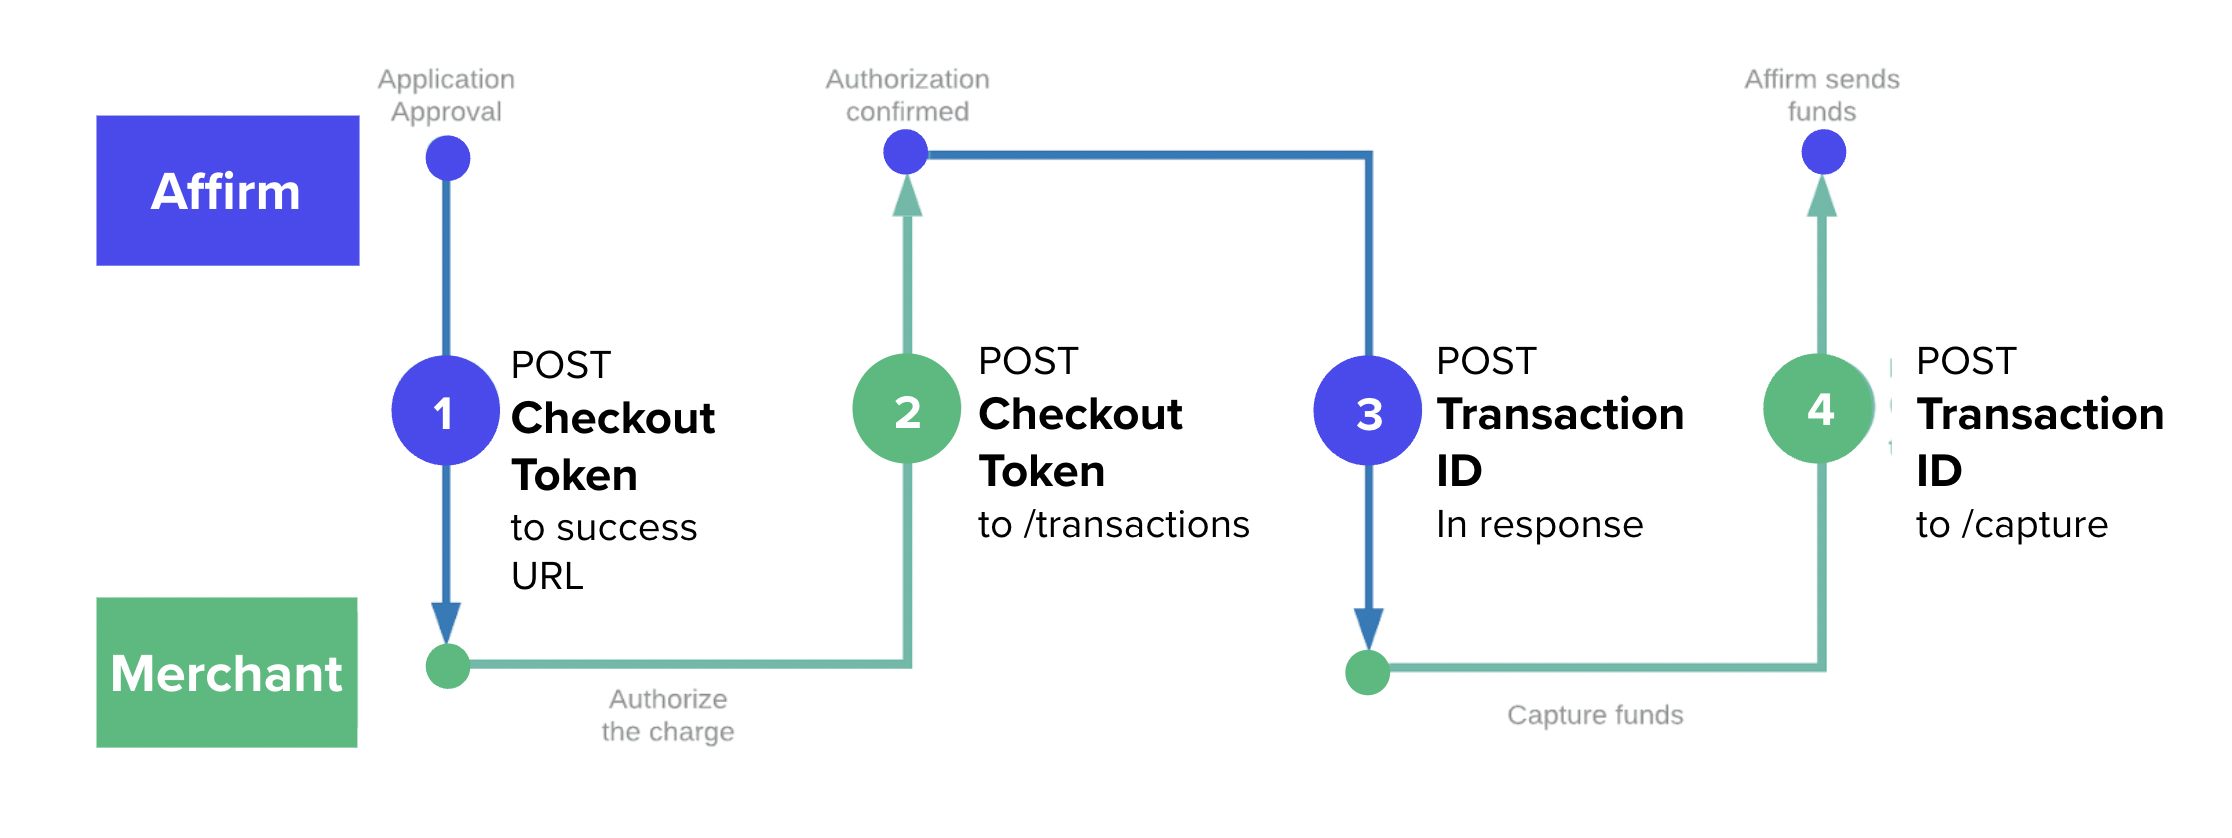
When a customer successfully completes a checkout, it is recorded as a new purchase attempt. This must be handled on your server-side to be fulfilled via our Transactions API.
The chart below illustrates what occurs on Affirm’s end and the merchant’s end during a successful checkout.

API de transaction
The global integration uses Affirm’s Transaction API.
- If you are currently using the Affirm Charges API, see this guide to switch from Charges to Transactions.
- If you are currently using the non-global Affirm Transactions API, see this guide to make global updates.
Country-code Request Header
To move outside of the United States, any API calls that are made to Affirm, such as Auth or Capture Transaction, need to include this custom HTTP header parameter to those requests:
country-code
When the country-code parameter is used, it is followed by the three-letter country code:
country-code: "CAN"
The country-code parameter tells Affirm which country of legal incorporation is associated with the store where the user’s transaction was made, and which Affirm regional environment to route the request to. This is also an alpha-3 country code. If this parameter is missing, we automatically use USA.
Any end-user disclosures or emails that might be associated with this API are sent in the language associated with the locale sent to Affirm.js when the transaction was made. For example, if ‘fr_CA” was passed to Affirm.js when the transaction was made, all emails and user communications associated with the APIs involved in this transaction are shown in Canadian French.
Authorization Process
1. Retrieve the checkout_token
checkout_tokenRetrieve and save the checkout_token sent by Affirm via a HTTP request to the success callback.
"checkout_token": "CJXXM8RERR0LC066"2. Authorize the checkout_token
checkout_tokenAuthorize the checkout_token by passing the value in the transaction_id parameter to /transactions within 24 hours.
curl --request POST \
     --url https://api.global.sandbox.affirm.com/api/v1/transactions \
     --header 'Accept: */*' \
     --header 'Content-Type: application/json' \
     --header 'country-code: CAN' \
     --data '
{
     "transaction_id": "CJXXM8RERR0LC066",
     "order_id": "JKLM4321"
}
'
3. Enregistrer l'ID retourné
After authorizing the transaction, save the id from the transaction object returned in the response.
{
    "id": "9RG3-PMSE"
    "currency": "CAD",
    "amount": 11500,
}
Error Handling
When the checkout request generates errors, we display the errors in a pop-up modal window on the page where checkout is initiated. In the modal window, we display specific messaging about the source of the error (e.g., "Invalid phone number").
You may define a callback function when the error modal is closed, but the callback does not relay any event data specific to the error message in the modal.
Voici un exemple de définition de ce rappel d'événement :
affirm.ui.ready(
    function() {
        affirm.ui.error.on("close", function(){
            alert("Please check your contact information for accuracy.");
        });
    	}
);
Error DescriptionsSome error descriptions will change for the global configuration.
Mis à jour 3 months ago
Congrats! Now that you've set up your basic integration, learn how to manage global transactions.