À propos de la télévente
La télévente est une méthode alternative pour amorcer le processus de paiement Affirm pour vos clients. Découvrez comment utiliser Affirm pour la télévente.
Disponibilité des pays
 USA
USA
Aperçu
L'API de paiement Télévente est une méthode efficace pour initier le processus de paiement Affirm. Cette fonctionnalité conviviale permet aux télévendeurs de lancer le processus de paiement pour les clients, en intégrant de manière transparente l’expérience avec le flux en magasin.
L'expérience client
Flux de clients
Lorsqu’un client termine son passage à la caisse, cela déclenche une redirection du navigateur ainsi qu’une requête webhook contenant le checkout_token pour l’autorisation.
Sécurité
Nous accordons la priorité à la confidentialité et à la sécurité de nos clients. Par conséquent, l’API de télévente exige que les clients présentent une demande à l’aide de leur propre appareil. Lorsqu'une demande d'API est soumise, Affirm envoie un message texte ou un courriel au numéro de téléphone ou à l'adresse courriel fourni, contenant un lien vers la demande en ligne du client.
L’Expérience du Commerçant
1. Ajoutez l'option de paiement Affirm à votre flux de télévente.
Lorsque les clients choisissent de payer avec Affirm par téléphone, votre télévendeur peut sélectionner Affirm comme option de paiement à partir de votre interface ou du tableau de bord de l’agent.
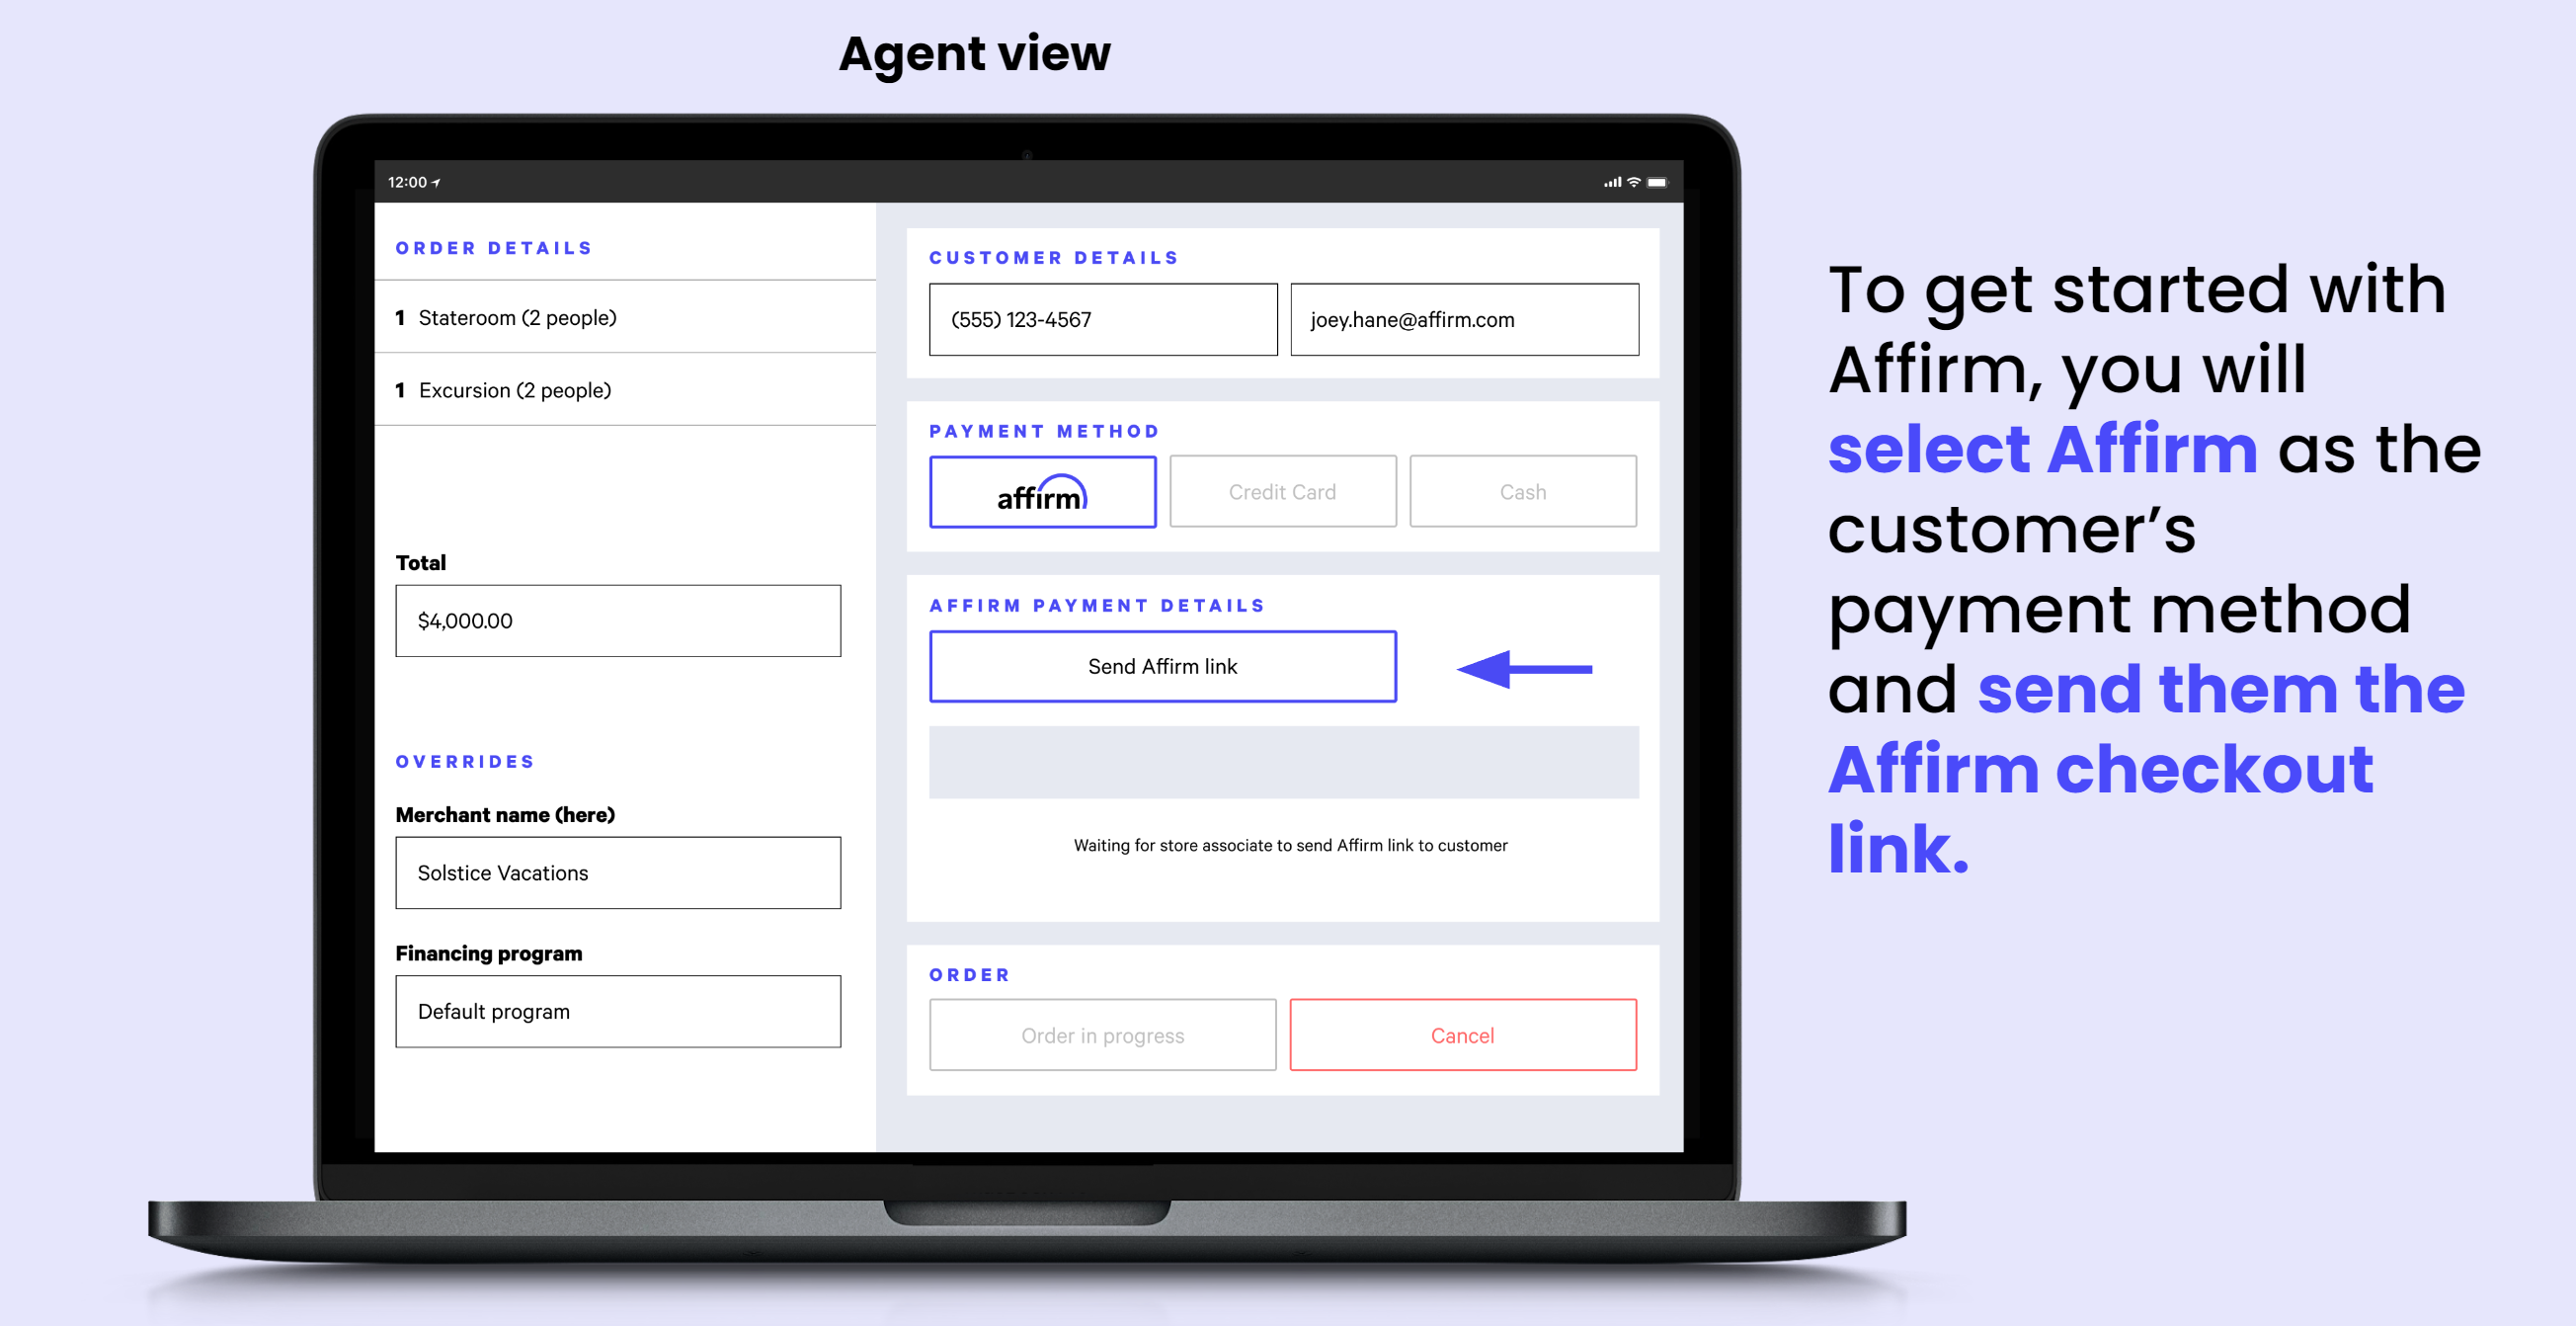
2. Appelez l'API du magasin pour initier la caisse.
Sélectionner Affirm comme mode de paiement déclenche Affirm. L’agent commercial clique ensuite sur Envoyer le lien Affirm pour initier la demande. Cela envoie un courriel et/ou un texto au client avec des instructions pour terminer son passage à la caisse avec Affirm.
Remarque : Si le client ne reçoit pas le courriel initial, l'agent peut cliquer sur le bouton Renvoyer pour envoyer un autre texto ou un autre courriel.
Exemple:
POST /api/v2/checkout/store HTTP/1.1
Host: sandbox.affirm.com
Content-Type: application/json

{
      "merchant": {
        "public_api_key":               "PUBLIC_API_KEY",
        "user_cancel_url":              "https://www.cancelurl.com",
        "user_confirmation_url":        "https://www.confirmationurl.com",
        "user_confirmation_url_action": "POST",
       "name":                         "Telesales Affirm demo"
      },
      "billing":{
        "name":{
          "full":                        "John Doe"
        },
        "address":{
          "line1":                       "325 Pacific Ave",
          "city":                        "San Francisco",
          "state":                       "CA",
          "zipcode":                     "94112",
          "country":                     "USA"
        },
        "phone_number":                  "4155552222",
        "email":                         "[email protected]"
      },
  "metadata": {
    "entity_name": "Vignan 1234",
    "store_location": "Denver"
  },
      "order_id":                        "your_order_identifier_ABC_123",
      "total":                           5000
  }
TestingL'API Magasin envoie des SMS uniquement dans l'environnement Affirm Live. Pendant les tests de l’environnement de test, vous pouvez utiliser uniquement les messages électroniques pour recevoir l’URL de paiement afin de finaliser votre achat Affirm.
Dans la réponse, vous recevez le redirect_url envoyé au client et uncheckout_id Affirm, utilisé pour l'autorisation.
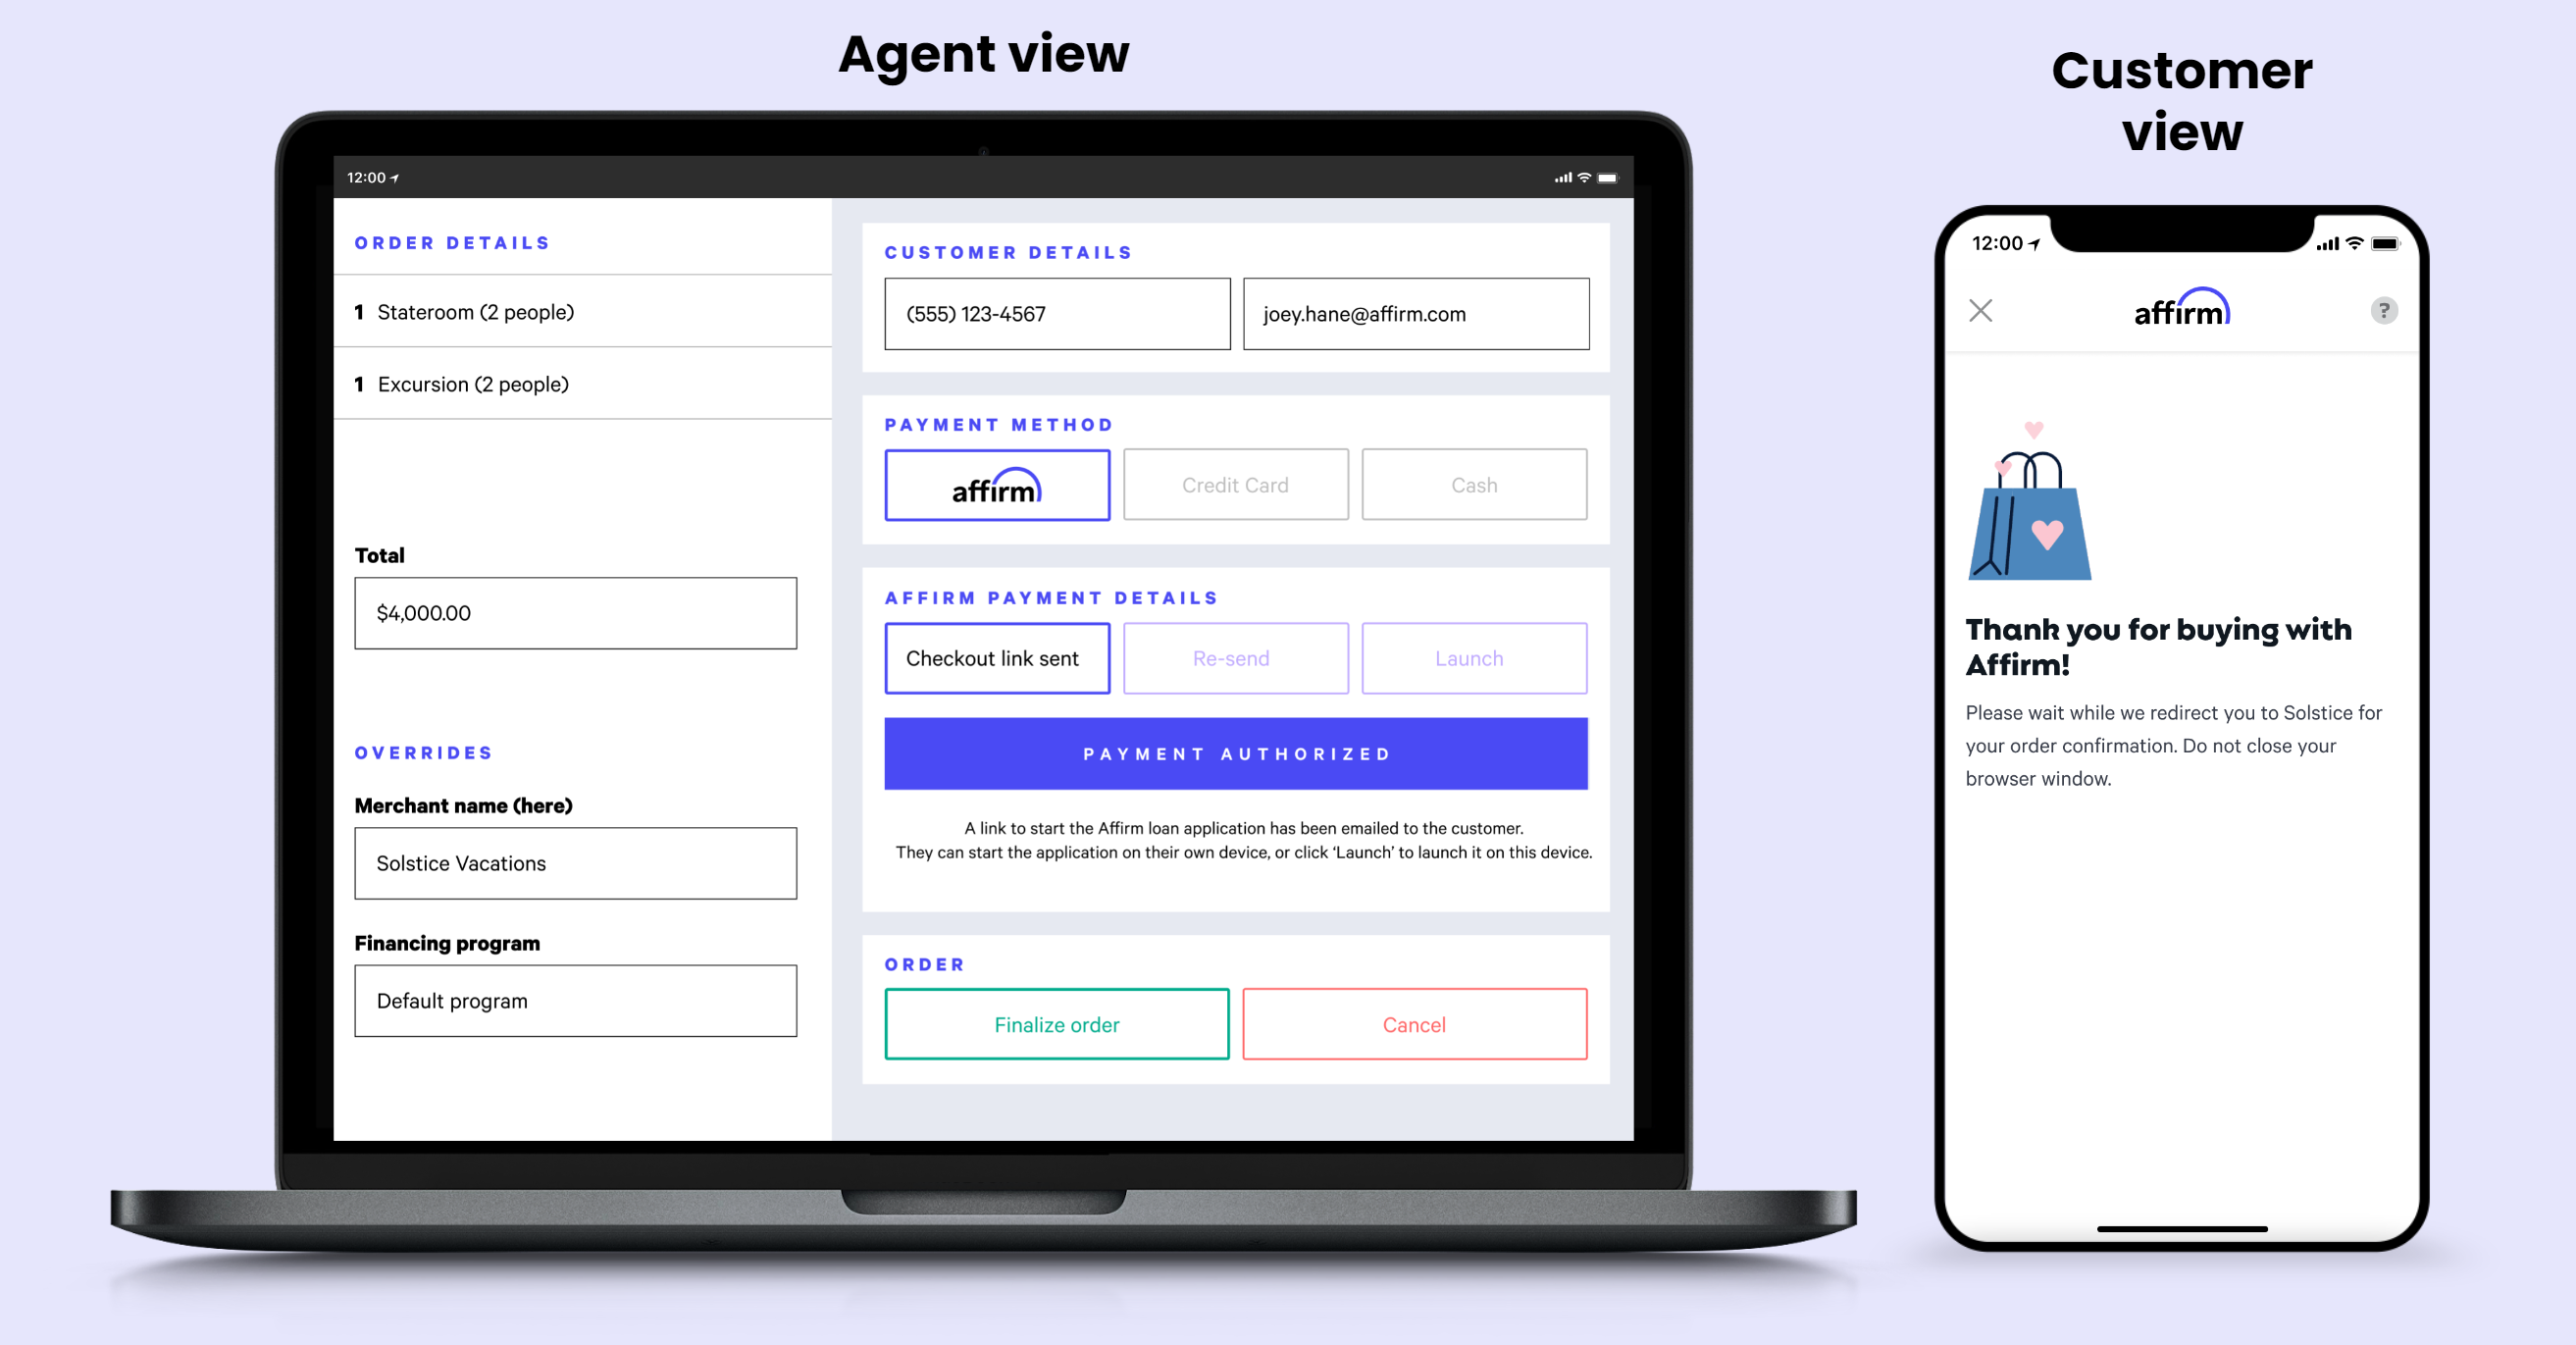
3. Recevoir la confirmation de commande via webhook.
Une fois que l'utilisateur a reçu et confirmé son prêt, le serveur d'Affirm est informé de l'événement et l'agent voit le statut « Confirmé ». Le checkout_id est renvoyé à votre serveur à l’URL du webhook que vous fournissez à votre gestionnaire de compte technique.
L'application utilise des webhooks pour mettre à jour l'interface de l'agent en fonction de la progression du client dans l'application Affirm.
Pour plus d’efficacité et de fiabilité, vous pouvez fournir à Affirm une adresse de lien de rappel pour la confirmation de serveur à serveur du
checkout_tokenaprès que le client a confirmé son prêt. Bien qu’Affirm continue de POSTER le jeton sur leuser_confirmation_url, l’utilisation d’un lien de rappel peut minimiser le risque d’erreurs client/navigateur et accélérer la mise à jour du statut de paiement dans votre système de télévente.
Configuration du webhook en magasinPour compléter une intégration en magasin, vous devez configurer une URL de webhook. Vous pouvez contacter Affirm par le biais de votre équipe de compte ou du widget d'assistance.
4. Autoriser la transaction.
Pour collecter les informations relatives à la transaction, vous devrez mettre en œuvre une logique supplémentaire pour autoriser et capturer le paiement de la transaction. Vous pouvez réutiliser cette logique en mettant à jour les clés API avec les clés spécifiques aux téléventes si vous avez implémenté Affirm dans votre canal de commerce électronique.
Appelez l’API Transactions d’Affirm, passez le checkout_id au paramètre transaction_id et autorisez la commande. La commande doit être autorisée en toute sécurité avant de la sauvegarder ou de mettre à jour le statut de la commande sur le tableau de bord de l’agent.
5. Capturer et gérer la commande.
Avec le id persistant reçu de l'autorisation, vous pouvez lancer différentes actions de transaction, comme la capture de la commande lors de son exécution ou l'émission d'un remboursement en fonction de vos processus internes.
Sujets recommandés
Mis à jour 5 months ago